OAuth and SAML Support
Introduction
LibreNMS has support for Laravel Socialite to try and simplify the use of OAuth 1 or 2 providers such as using GitHub, Microsoft, Twitter + many more and SAML.
Socialite Providers supports more than 100+ 3rd parties so you will most likely find support for the SAML or OAuth provider you need without too much trouble.
Please do note however, these providers are not maintained by LibreNMS so we cannot add support for new ones and we can only provide you basic help with general configuration. See the Socialite Providers website for more information on adding a new OAuth provider.
Below we will guide you on how to install SAML or some of these OAth providers, you should be able to use these as a guide on how to install any others you may need but please, please, ensure you read the Socialite Providers documentation carefully.
GitHub Provider Microsoft Provider Okta Provider SAML2
Requirements
LibreNMS version 22.3.0 or later.
Please ensure you set APP_URL within your .env file so that callback URLs work correctly with the identify provider.
Note
Once you have configured your OAuth or SAML2 provider, please ensure you check the Post configuration settings section at the end.
GitHub and Microsoft Examples
Install plugin
Note
First we need to install the plugin itself. The plugin name can be slightly different so be sure to check the Socialite Providers documentation and look for this line, composer require socialiteproviders/github which will give you the name you need for the command, i.e: socialiteproviders/github.
lnms plugin:add socialiteproviders/github
lnms plugin:add socialiteproviders/microsoft
lnms plugin:add socialiteproviders/okta
Find the provider name
Next we need to find the provider name and writing it down
Note
It's almost always the name of the provider in lowercase but can be different so check the Socialite Providers documentation and look for this line, github => [ which will give you the name you need for the above command: github.
For GitHub we can find the line:
'github' => [
  'client_id' => env('GITHUB_CLIENT_ID'),
  'client_secret' => env('GITHUB_CLIENT_SECRET'),
  'redirect' => env('GITHUB_REDIRECT_URI')
],
github, write this down. For Microsoft we can find the line:
'microsoft' => [
  'client_id' => env('MICROSOFT_CLIENT_ID'),
  'client_secret' => env('MICROSOFT_CLIENT_SECRET'),
  'redirect' => env('MICROSOFT_REDIRECT_URI')
],
microsoft, write this down. For Okta we can find the line:
'okta' => [
  'base_url' => env('OKTA_BASE_URL'),
  'client_id' => env('OKTA_CLIENT_ID'),
  'client_secret' => env('OKTA_CLIENT_SECRET'),
  'redirect' => env('OKTA_REDIRECT_URI')
],
okta, write this down. Register OAuth application
Register a new application
Now we need some values from the OAuth provider itself, in most cases you need to register a new "OAuth application" at the providers site. This will vary from provider to provider but the process itself should be similar to the examples below.
Note
The callback URL is always: https://your-librenms-url/auth/provider/callback It doesn't need to be a public available site, but it almost always needs to support TLS (https)!
For our example with GitHub we go to GitHub Developer Settings and press "Register a new application":
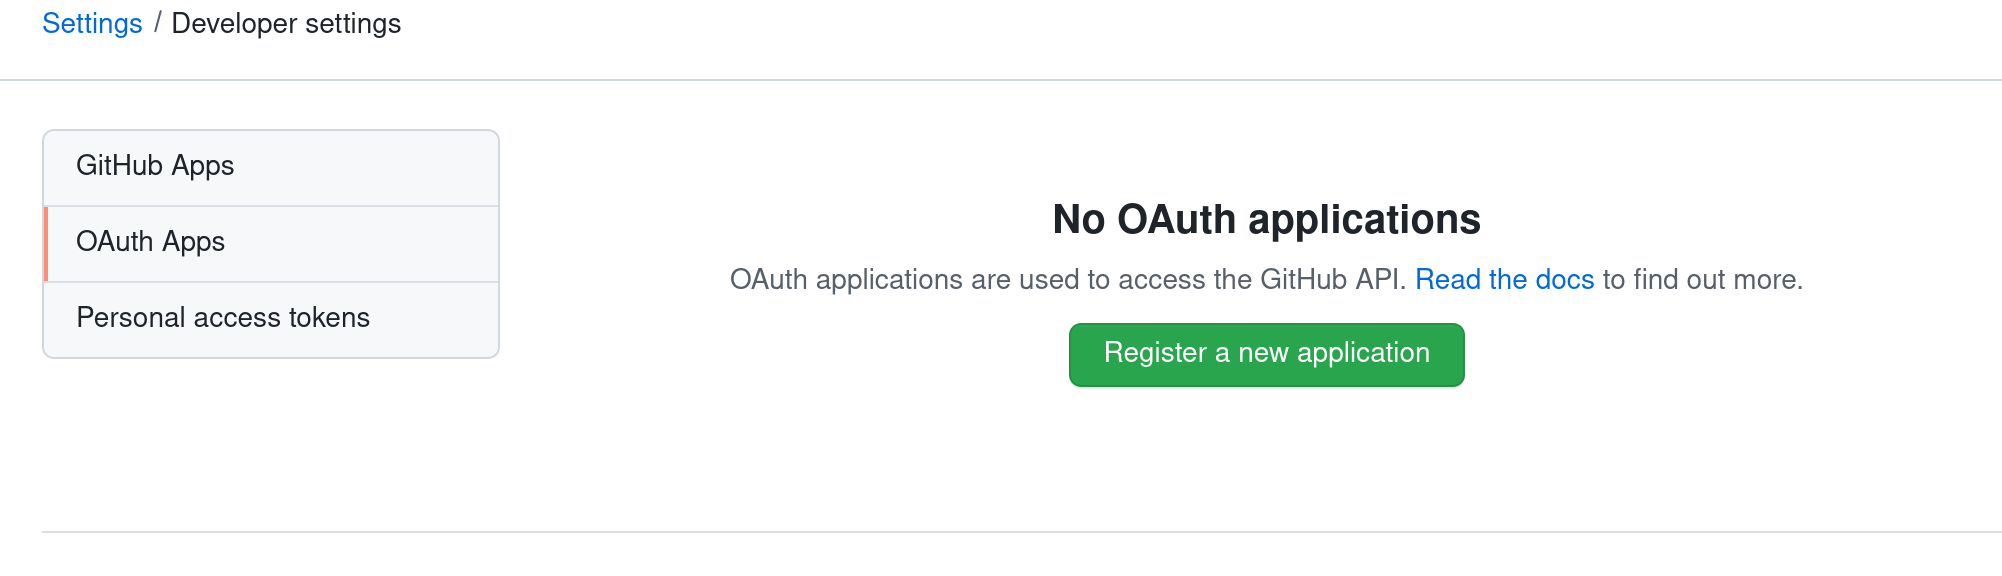
Fill out the form accordingly (with your own values): 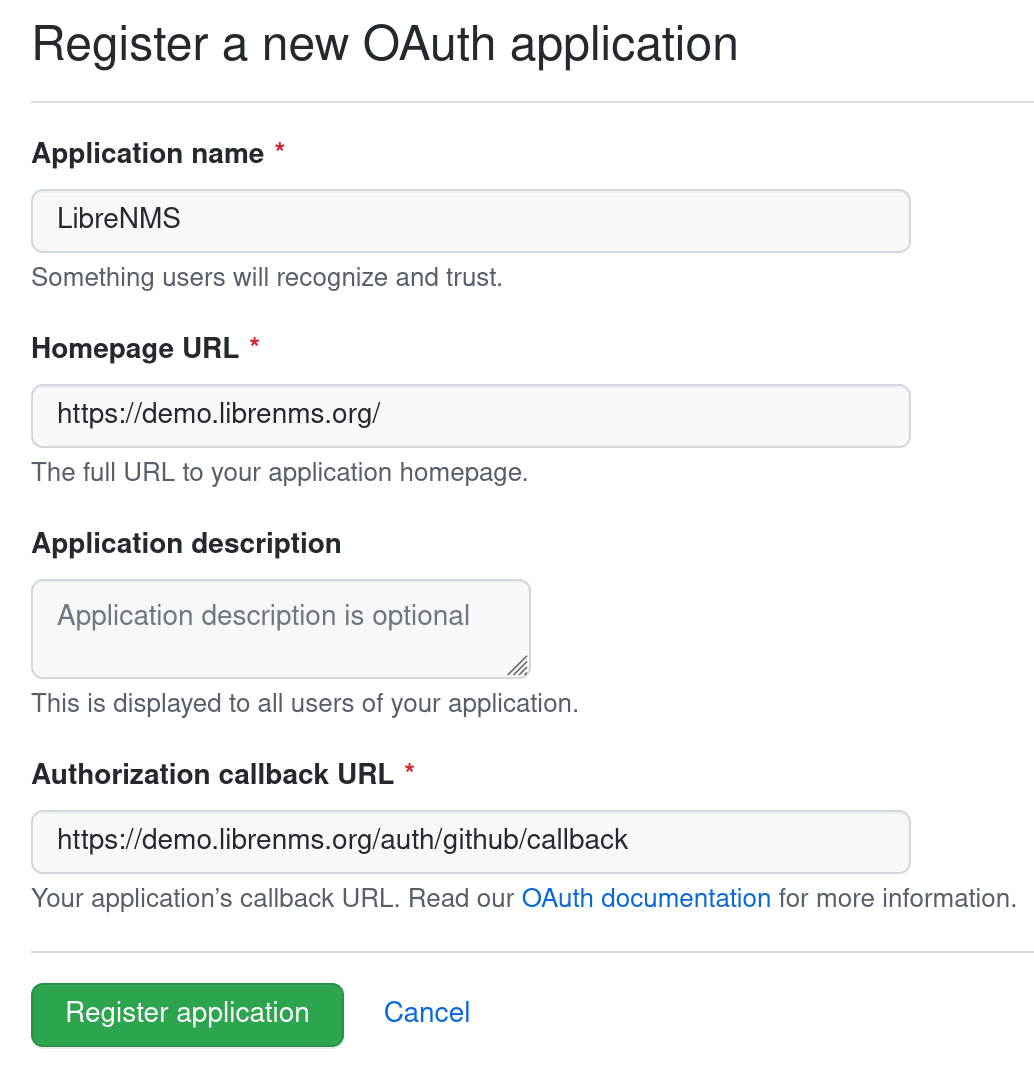
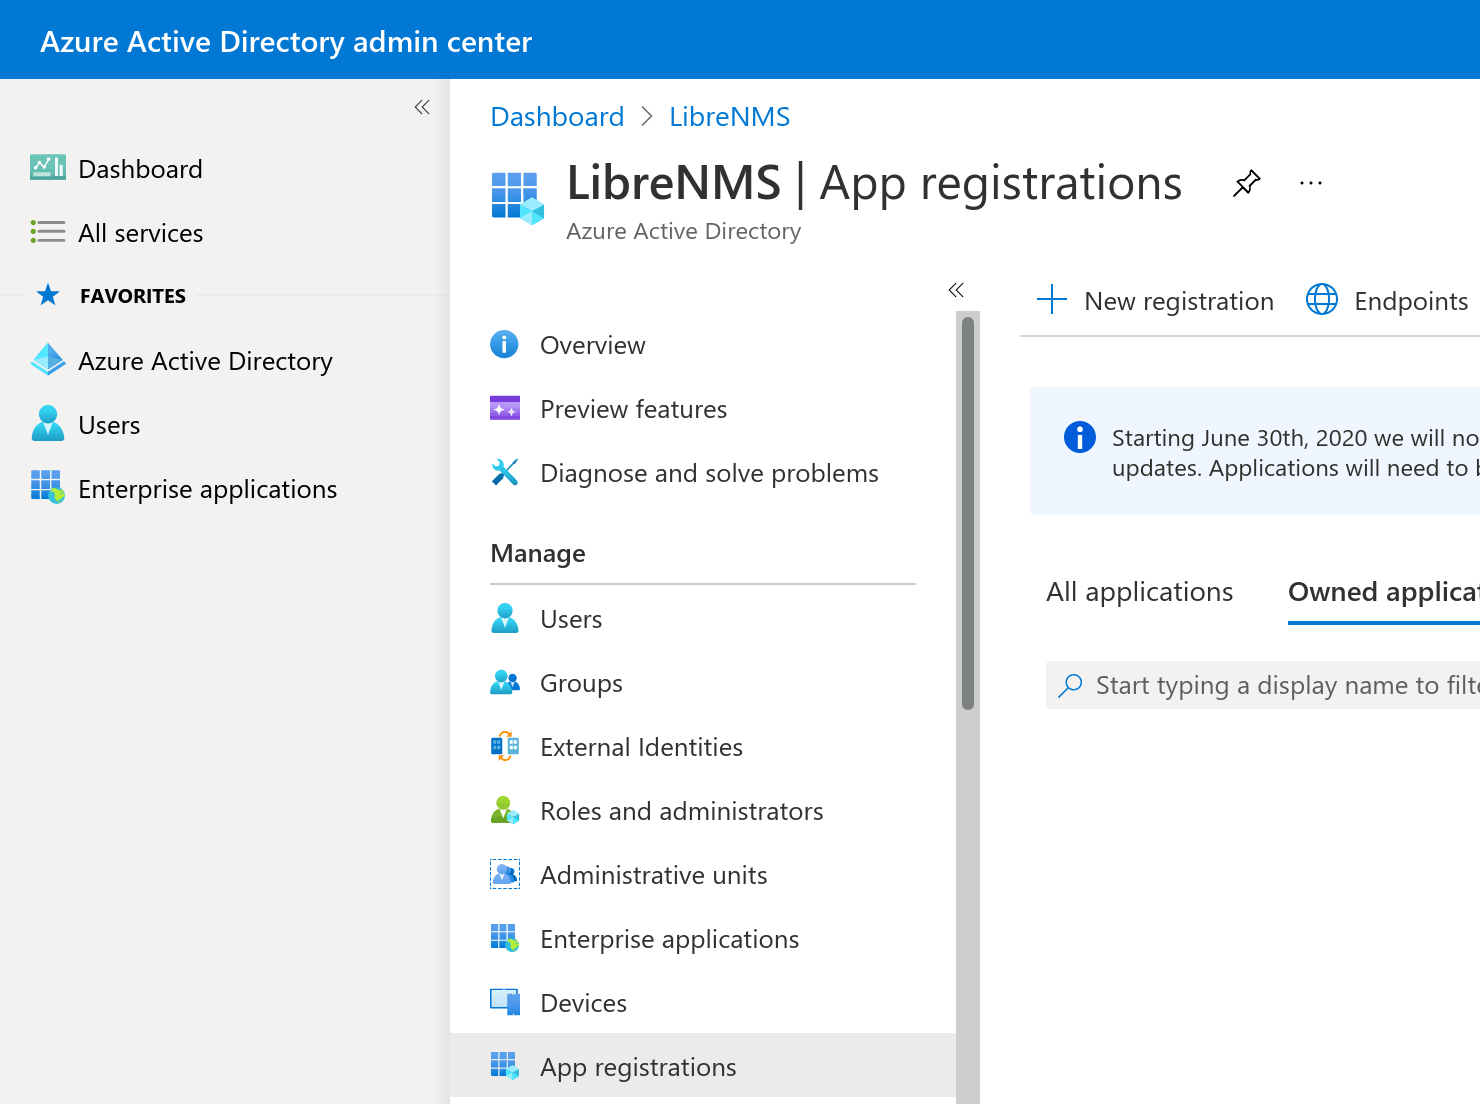
For our example with Microsoft we go to "Azure Active Directory" > "App registrations" and press "New registration"
Fill out the form accordingly using your own values): 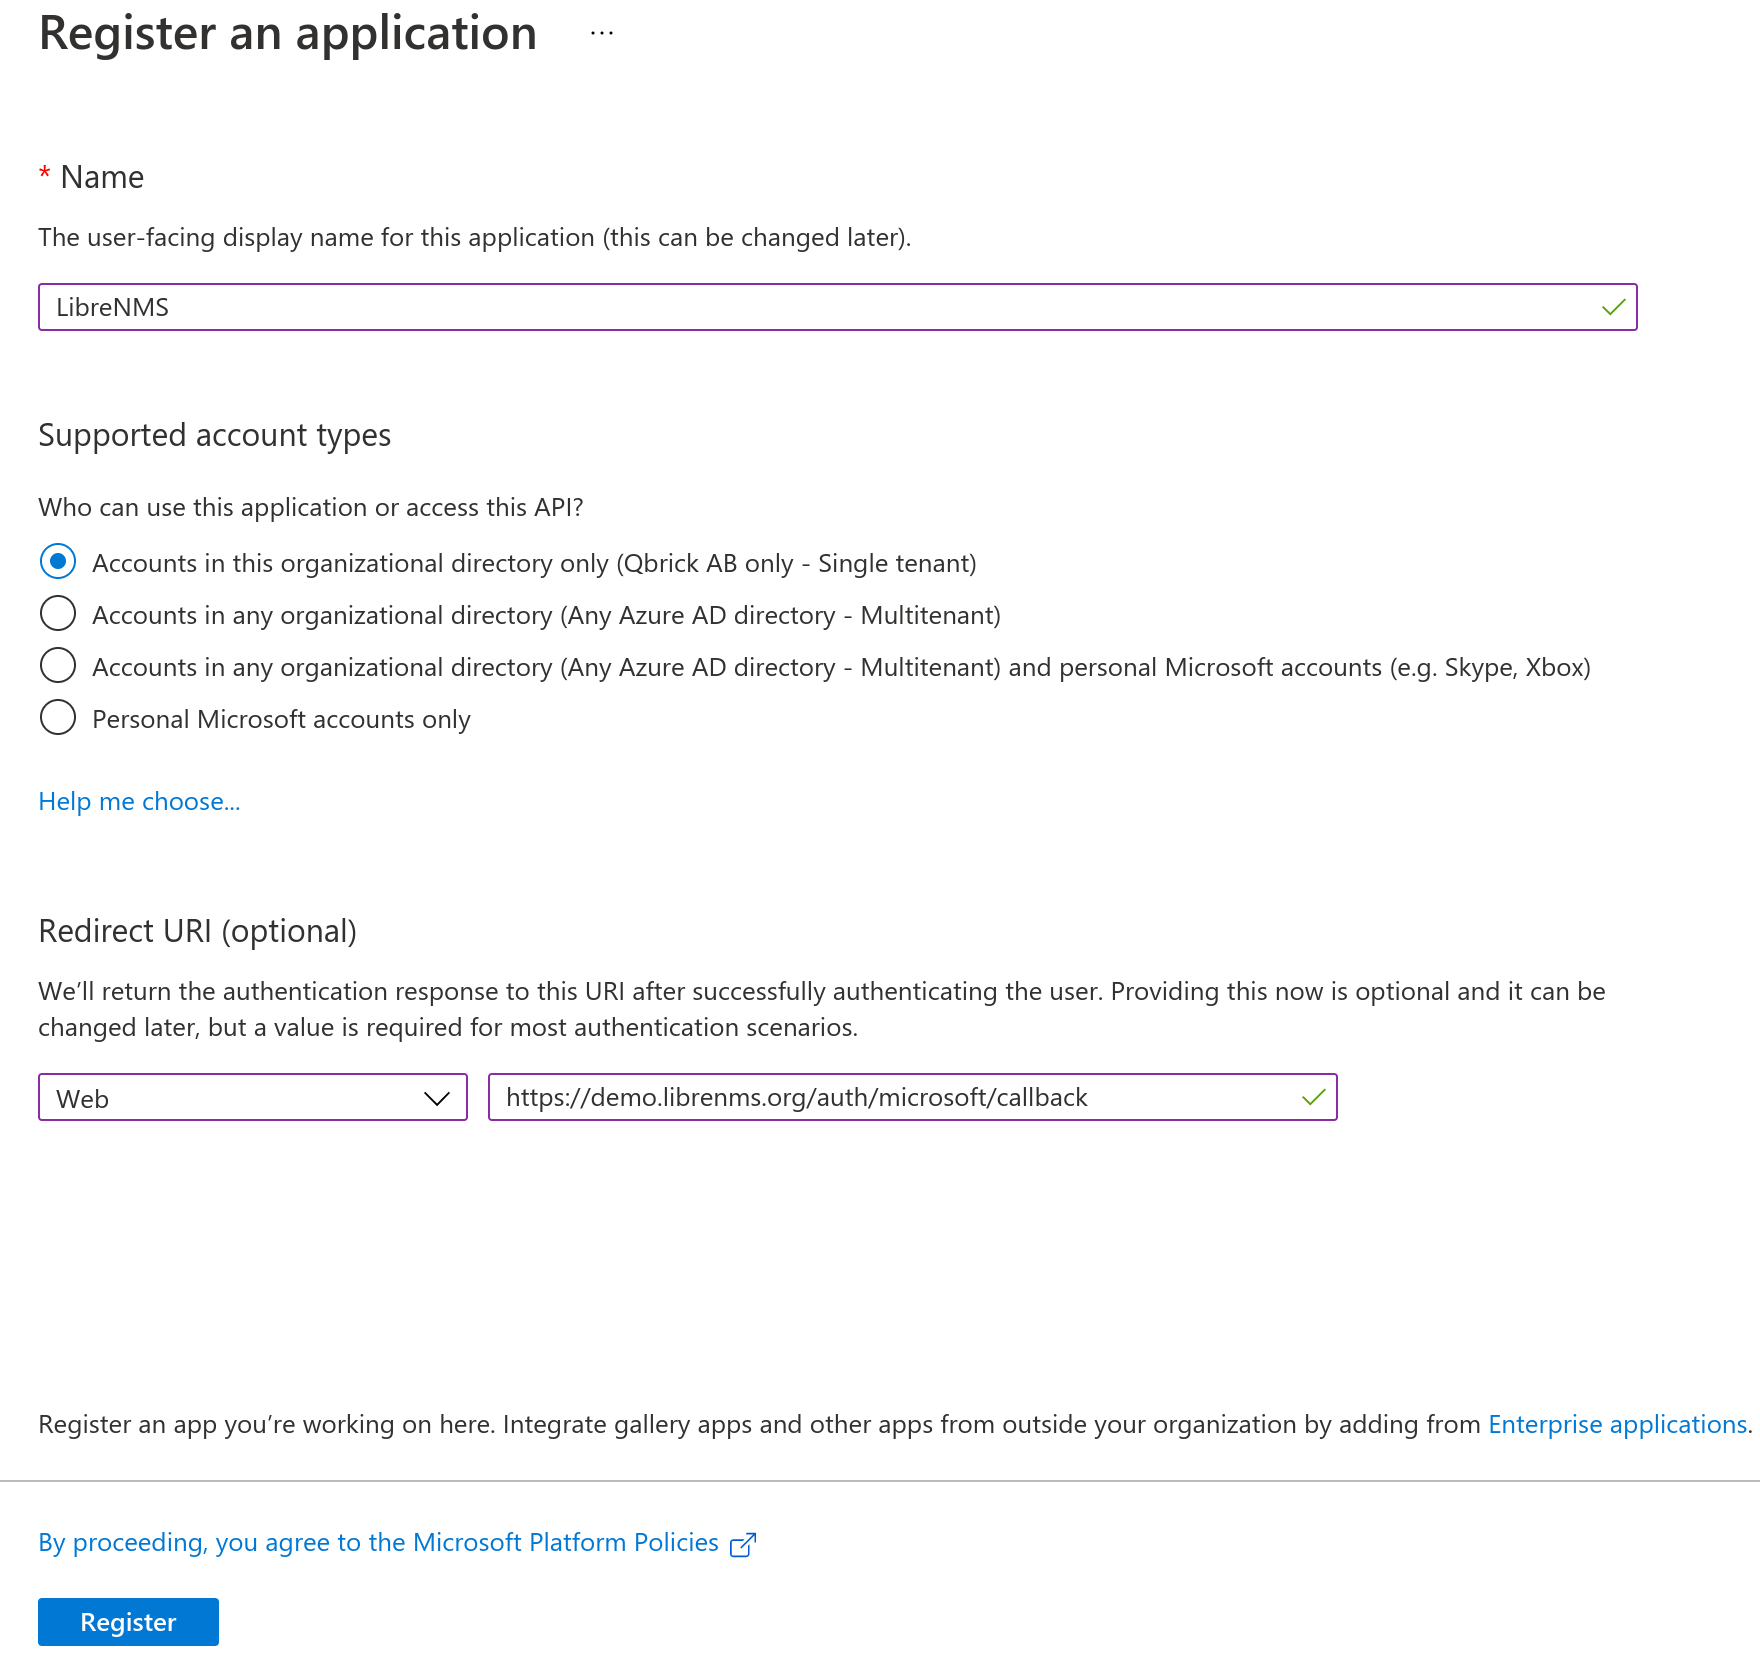
Copy the value of the Application (client) ID and Directory (tenant) ID and save them, you will need them in the next step. 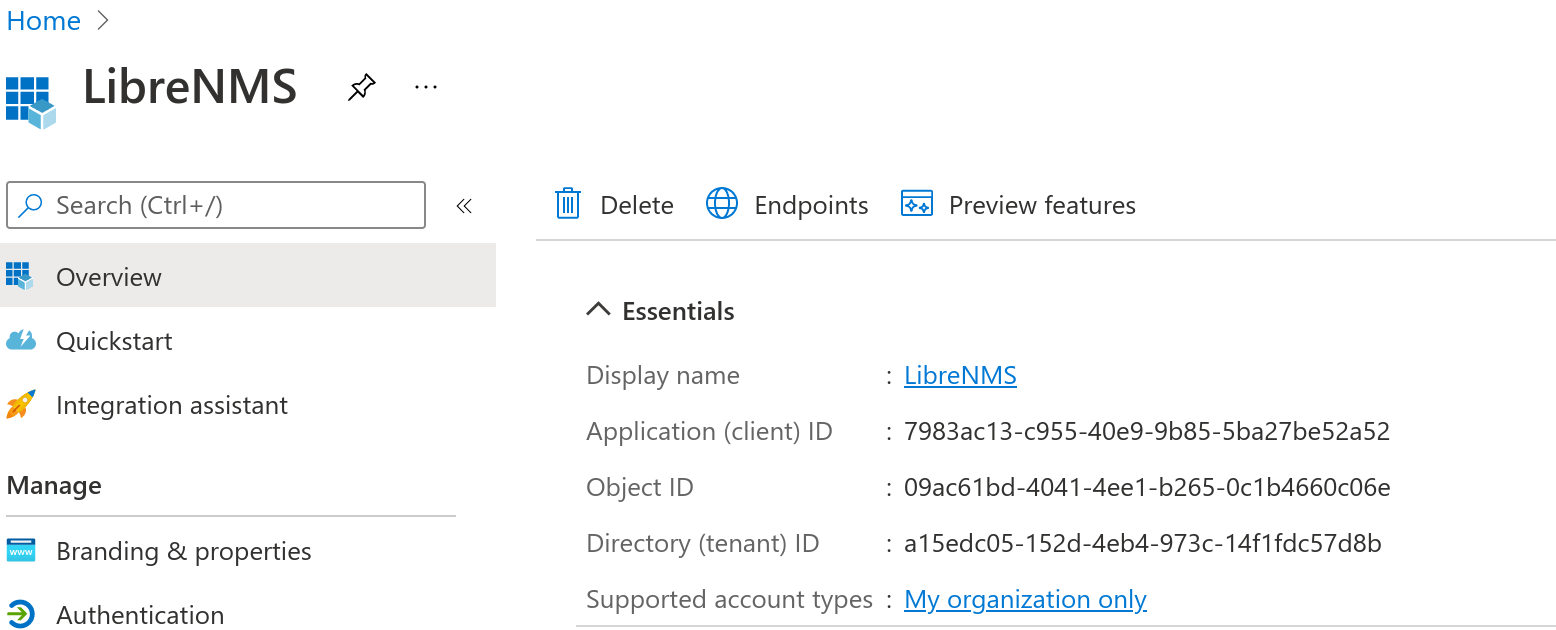
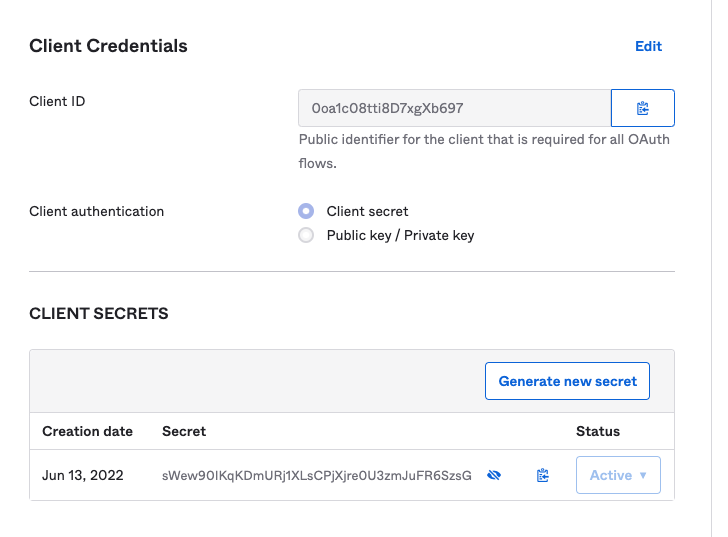
For our example with Okta, we go to Applications>Create App Integration, Select OIDC - OpenID Connect, then Web Application.
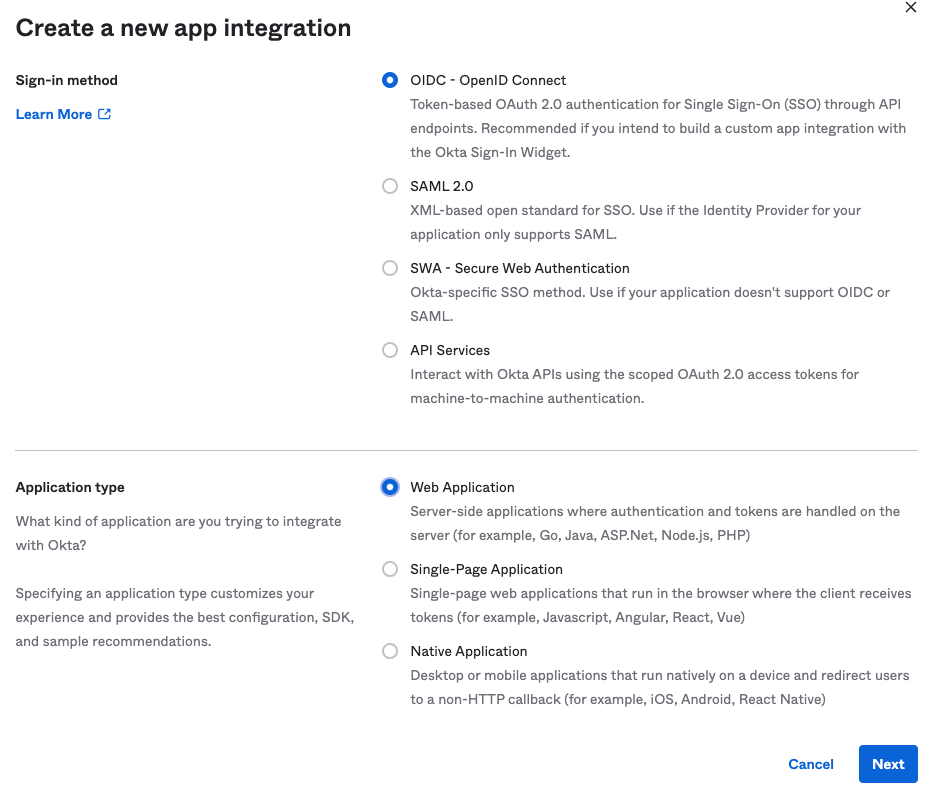
Fill in the Name, Logo, and Assignments based on your preferred settings. Leave the Sign-In Redirect URI field, this is where you will edit this later: 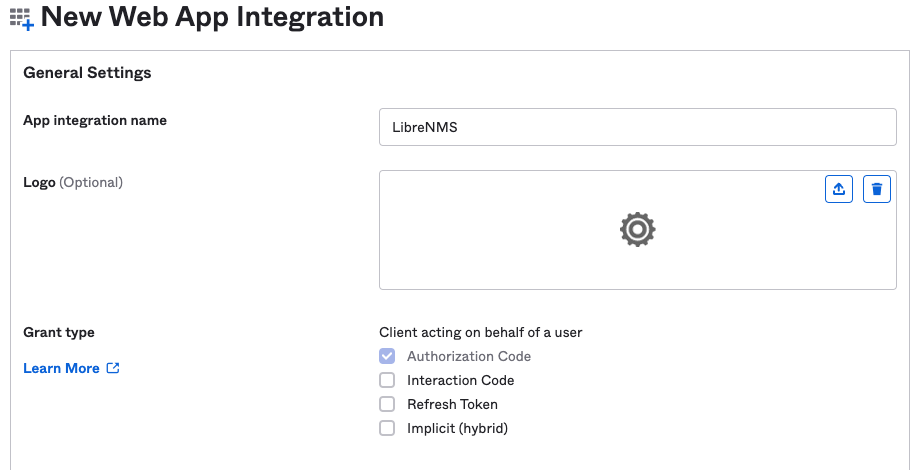
Note your Okta domain or login url. Sometimes this can be a vanity url like login.company.com, or sometimes just company.okta.com.
Click save.
Generate a new client secret
Press 'Generate a new client secret' to get a new client secret.
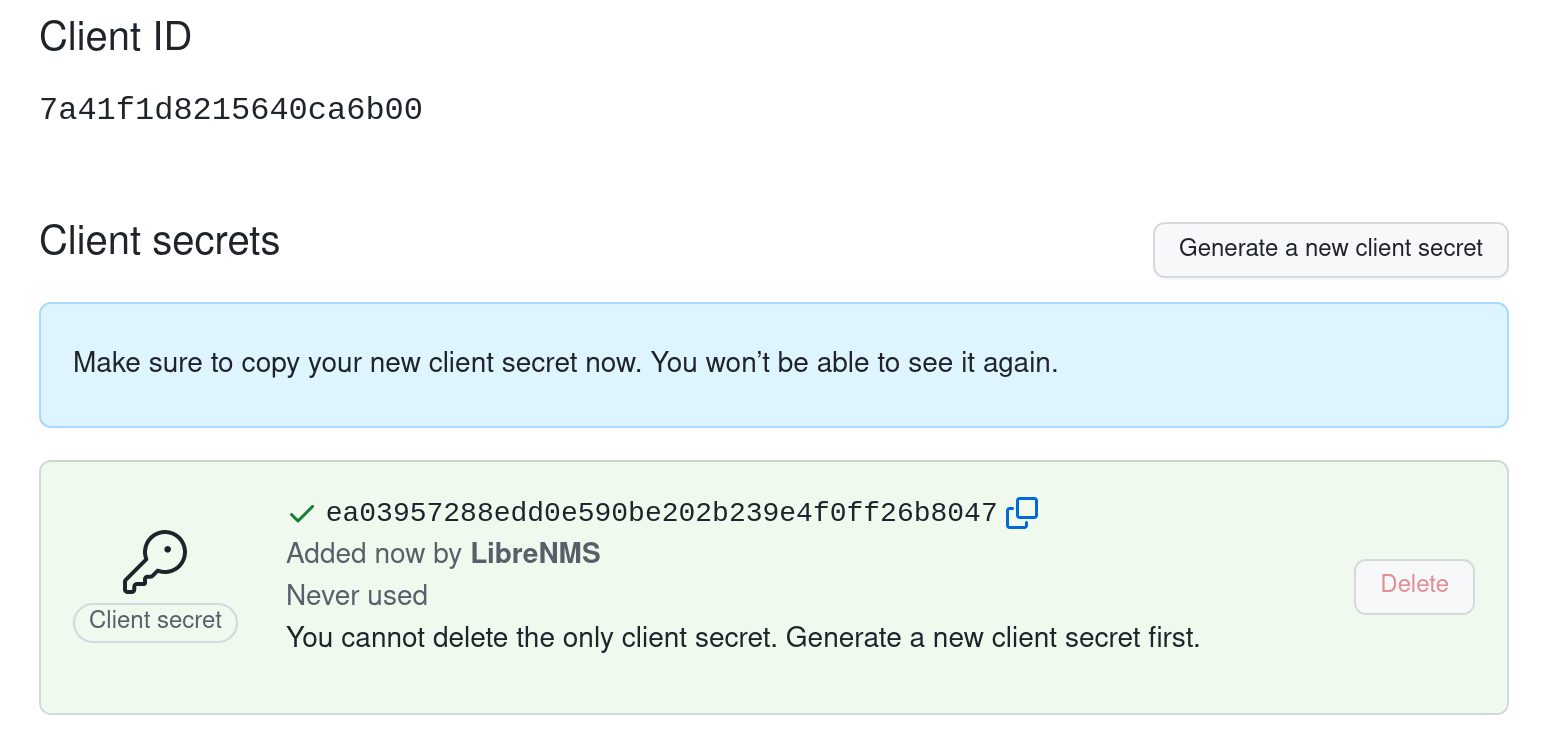
Copy the Client ID and Client secret
In the example above it is:
Client ID: 7a41f1d8215640ca6b00 Client secret: ea03957288edd0e590be202b239e4f0ff26b8047
Select Certificates & secrets under Manage. Select the 'New client secret' button. Enter a value in Description and select one of the options for Expires and select 'Add'.

Copy the client secret Value (not Secret ID!) before you leave this page. You will need it in the next step.

This step is done for you when creating the app. All you have to do is copy down the client secret. You will need it in the next step.
Saving configuration
Now we need to set the configuration options for your provider within LibreNMS itself. Please replace the values in the examples below with the values you collected earlier:
The format of the configuration string is auth.socialite.configs.*provider name*.*value*
settings/auth/socialite
lnms config:set auth.socialite.configs.github.client_id 7a41f1d8215640ca6b00
lnms config:set auth.socialite.configs.github.client_secret ea03957288edd0e590be202b239e4f0ff26b8047
settings/auth/socialite
lnms config:set auth.socialite.configs.microsoft.client_id 7983ac13-c955-40e9-9b85-5ba27be52a52
lnms config:set auth.socialite.configs.microsoft.client_secret J9P7Q~K2F5C.L243sqzbGj.cOOcjTBgAPak_l
lnms config:set auth.socialite.configs.microsoft.tenant a15edc05-152d-4eb4-973c-14f1fdc57d8b
settings/auth/socialite
lnms config:set auth.socialite.configs.okta.client_id 0oa1c08tti8D7xgXb697
lnms config:set auth.socialite.configs.okta.client_secret sWew90IKqKDmURj1XLsCPjXjre0U3zmJuFR6SzsG
lnms config:set auth.socialite.configs.okta.base_url "https://<okta_login_url>"
Add provider event listener
The final step is to now add an event listener.
Note
It's important to copy exactly the right value here, It should begin with a \ and end before the ::class.'@handle'
Find the section looking like:
protected $listen = [
    \SocialiteProviders\Manager\SocialiteWasCalled::class => [
        // ... other providers
        \SocialiteProviders\GitHub\GitHubExtendSocialite::class.'@handle',
    ],
];
Copy the part: \SocialiteProviders\GitHub\GitHubExtendSocialite and run;
settings/auth/socialite
lnms config:set auth.socialite.configs.github.listener "\SocialiteProviders\GitHub\GitHubExtendSocialite"
Don't forget the initial backslash (\) !
Find the section looking like:
protected $listen = [
    \SocialiteProviders\Manager\SocialiteWasCalled::class => [
        // ... other providers
        \SocialiteProviders\Microsoft\MicrosoftExtendSocialite::class.'@handle',
    ],
];
Copy the part: \SocialiteProviders\Microsoft\MicrosoftExtendSocialite and run;
settings/auth/socialite
lnms config:set auth.socialite.configs.microsoft.listener "\SocialiteProviders\Microsoft\MicrosoftExtendSocialite"
Don't forget the initial backslash (\) !
Find the section looking like:
protected $listen = [
\SocialiteProviders\Manager\SocialiteWasCalled::class => [
    // ... other providers
    \SocialiteProviders\Okta\OktaExtendSocialite::class.'@handle',
],
];
Copy the part: \SocialiteProviders\Okta\OktaExtendSocialite and run;
settings/auth/socialite
lnms config:set auth.socialite.configs.okta.listener "\SocialiteProviders\Okta\OktaExtendSocialite"
Don't forget the initial backslack (\) !
Now you are done with setting up the OAuth provider! If it doesn't work, please double check your configuration values by using the config:get command below.
settings/auth/socialite
lnms config:get auth.socialite
Default Role
Since most Socialite Providers don't provide Authorization only Authentication it is possible to set the default User Role for Authorized users. Appropriate care should be taken.
-
none: No Permissions: User has no permissions assigned
-
normal: Normal User: You will need to assign device / port permissions for users at this level.
-
global-read: Global Read: Read only Administrator.
-
admin: Administrator: This is a global read/write admin account.
settings/auth/socialite
lnms config:set auth.socialite.default_role global-read
Claims / Access Scopes
Socialite can specify scopes that should be included with in the authentication request. (see Larvel docs )
For example, if Okta is configured to expose group information it is possible to use these group names to configure User Roles.
This requires configuration in Okta. You can set the 'Groups claim type' to 'Filter' and supply a regex of which groups should be returned which can be mapped below.
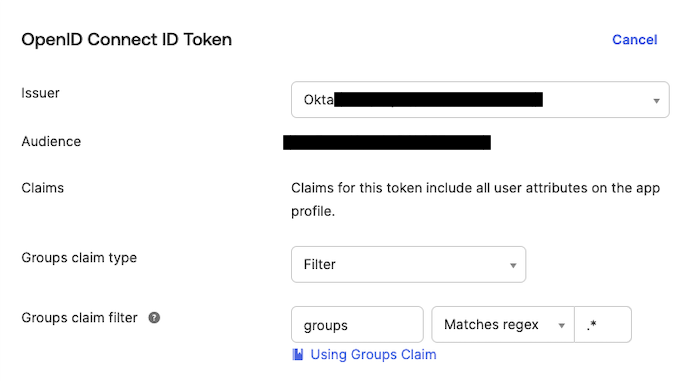
First enable sending the 'groups' claim (along with the normal openid, profile, and email claims). Be aware that the scope name must match the claim name. For identity providers where the scope does not match (e.g. Keycloak: roles -> groups) you need to configure a custom scope.
settings/auth/socialite
lnms config:set auth.socialite.scopes.+ groups
Then setup mappings from the returned claim arrays to the User levels you want
settings/auth/socialite
lnms config:set auth.socialite.claims.RETURN_FROM_CLAIM.roles '["admin"]'
lnms config:set auth.socialite.claims.OTHER_RETURN_FROM_CLAIM.roles '["global-read","cleaner"]'
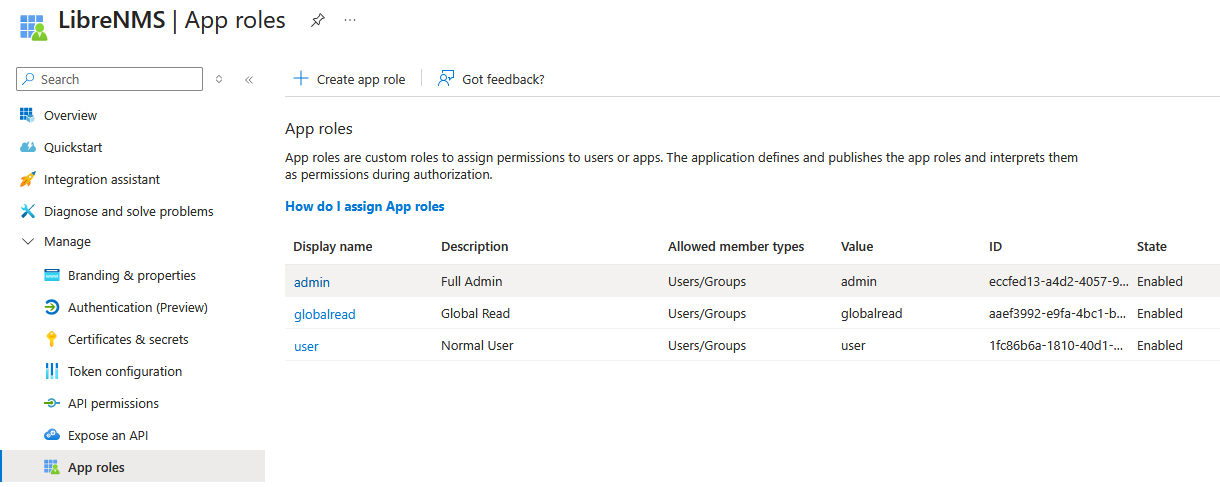
For example in Microsoft EntraID you need to configure roles that are sent back to LibreNMS
This requires configuration in EntraID.
create roles.
assign roles to groups
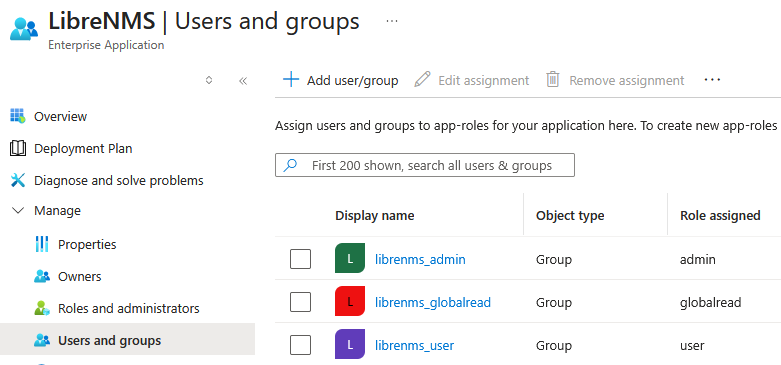
Then setup mappings from the returned claim arrays to the User levels you want
settings/auth/socialite
lnms config:set auth.socialite.claims.RETURN_FROM_CLAIM.roles '["admin"]'
lnms config:set auth.socialite.claims.OTHER_RETURN_FROM_CLAIM.roles '["global-read","cleaner"]'
Full
lnms config:get auth.socialite.default_role none
lnms config:set auth.socialite.configs.microsoft.claim_field roles
lnms config:set auth.socialite.scopes '["profile"]'
lnms config:set auth.socialite.claims.admin.roles '["admin"]'
lnms config:set auth.socialite.claims.globalread.roles '["global-read"]'
lnms config:set auth.socialite.claims.user.roles '["user"]'
it is also possible to add groups claims and use groupids but this is the recommended microsoft way.
Claim Field (advanced)
Some providers deliver role or group membership under a token claim field that is not a valid OAuth scope name. Microsoft is a common example: app-role assignments arrive in the roles claim, but adding roles to auth.socialite.scopes causes Microsoft to return:
AADSTS650053: The application asked for scope 'roles' that doesn't exist
The claim_field option solves this by separating what is requested from the IdP (scopes) from what key is read in the returned token (claim_field). It is configured per provider under auth.socialite.configs.<provider>.claim_field and accepts an string.
lnms config:set auth.socialite.configs.microsoft.claim_field roles
SAML2 Example
Install plugin
The first step is to install the plugin itself.
lnms plugin:add socialiteproviders/saml2
Add configuration
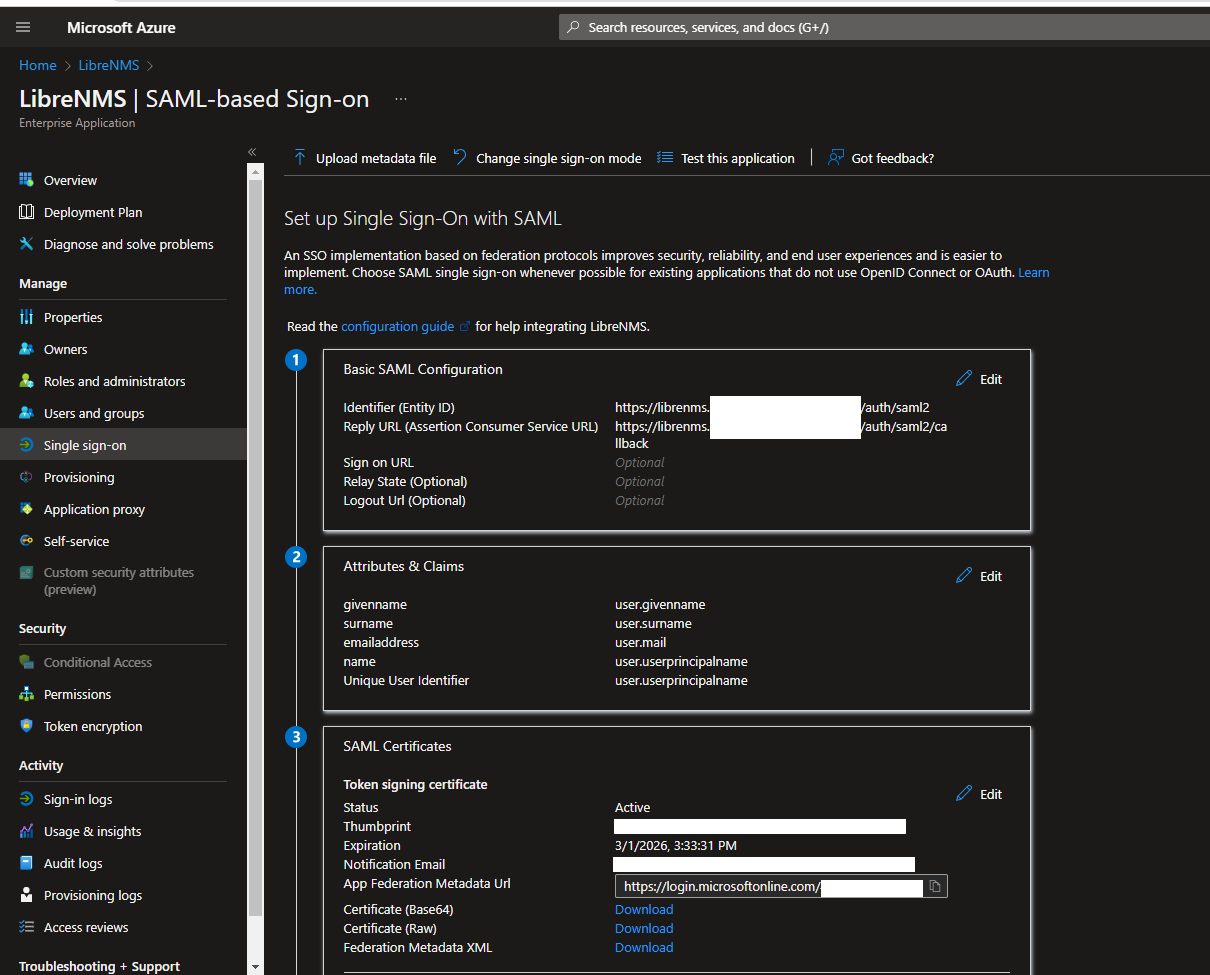
Depending on what your identity provider (Google, Azure, ...) supports, the configuration could look different from what you see next so please use this as a rough guide. It is up the IdP to provide the relevant details that you will need for configuration.
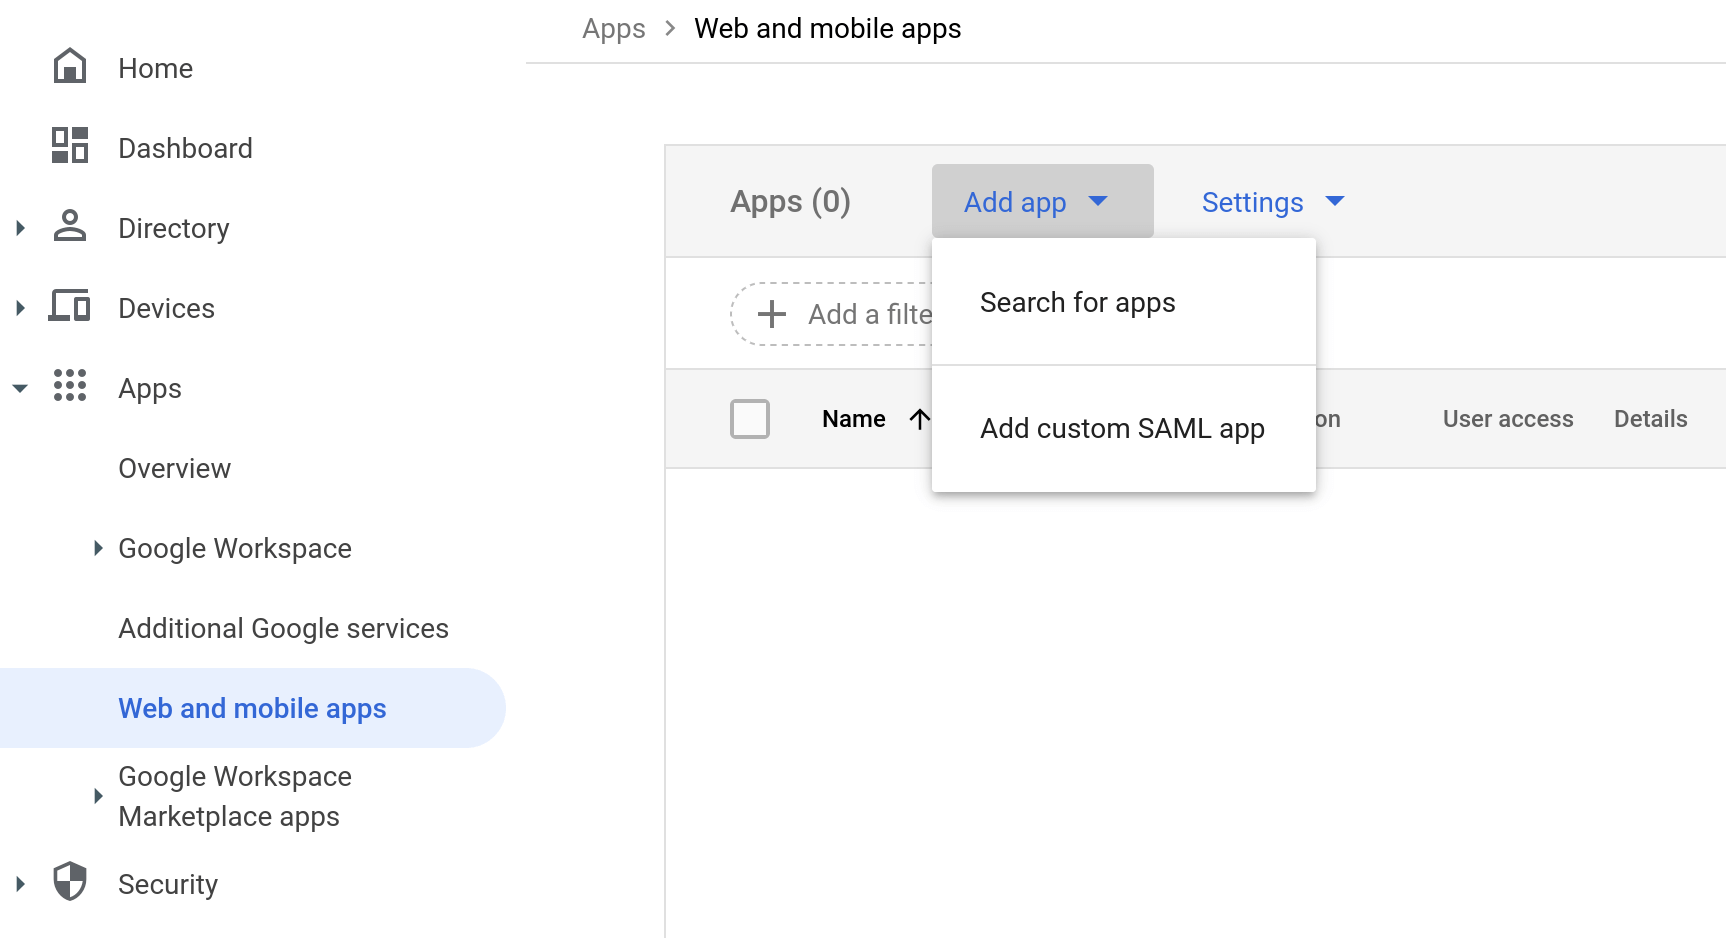
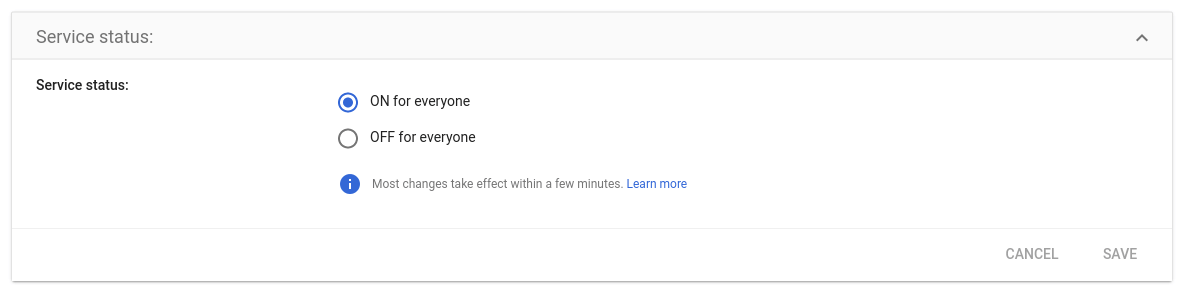
Go to https://admin.google.com/ac/apps/unified

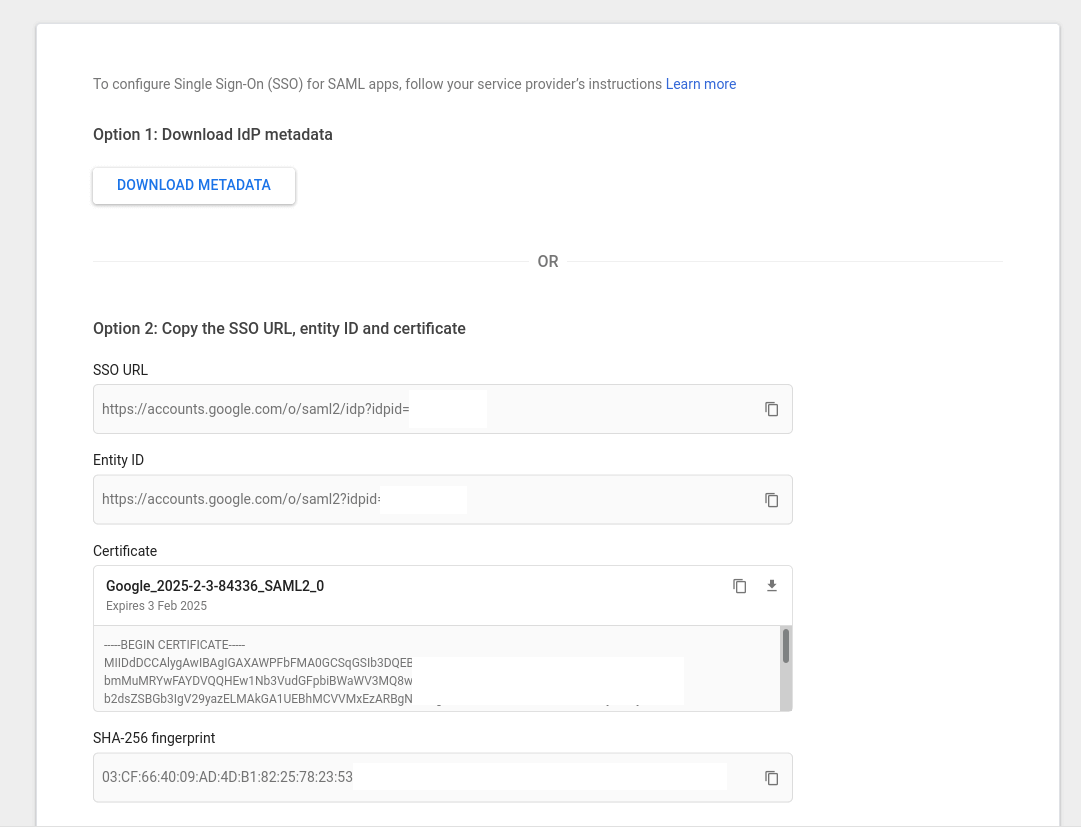
Press "DOWNLOAD METADATA" and save the file somewhere accessible by your LibreNMS server
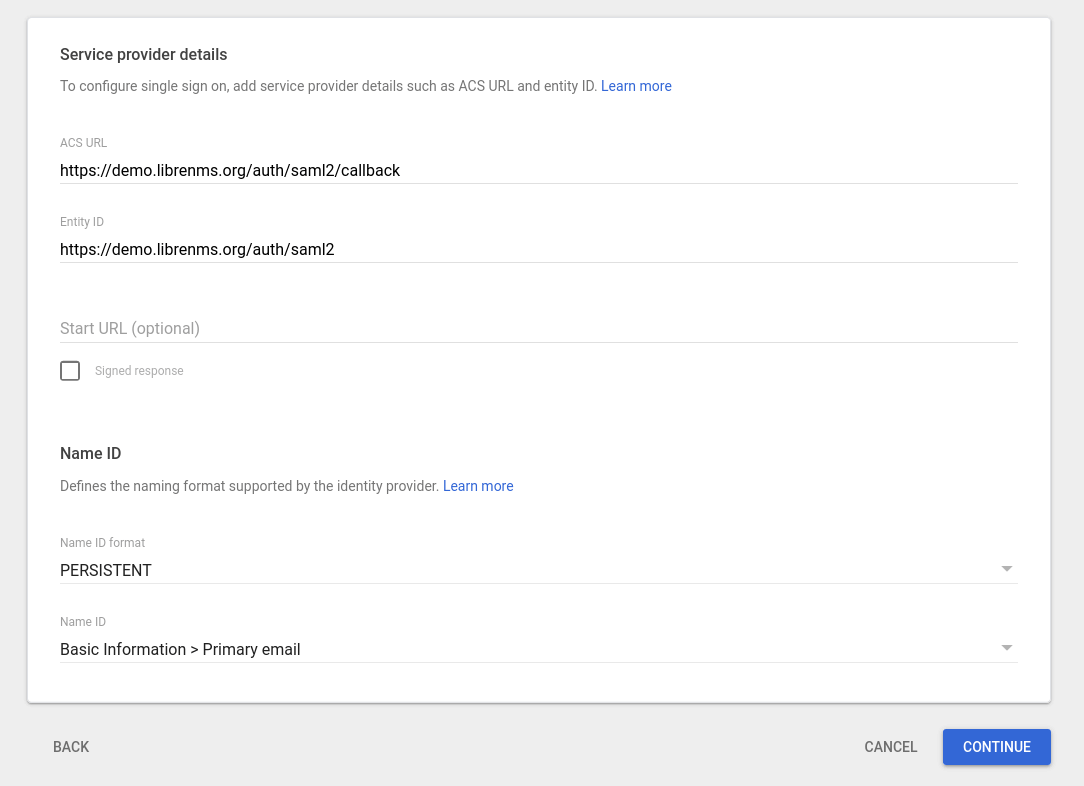
ACS URL = https://your-librenms-url/auth/saml2/callback Entity ID = https://your-librenms-url/auth/saml2 Name ID format = PERSISTENT Name ID = Basic Information > Primary email
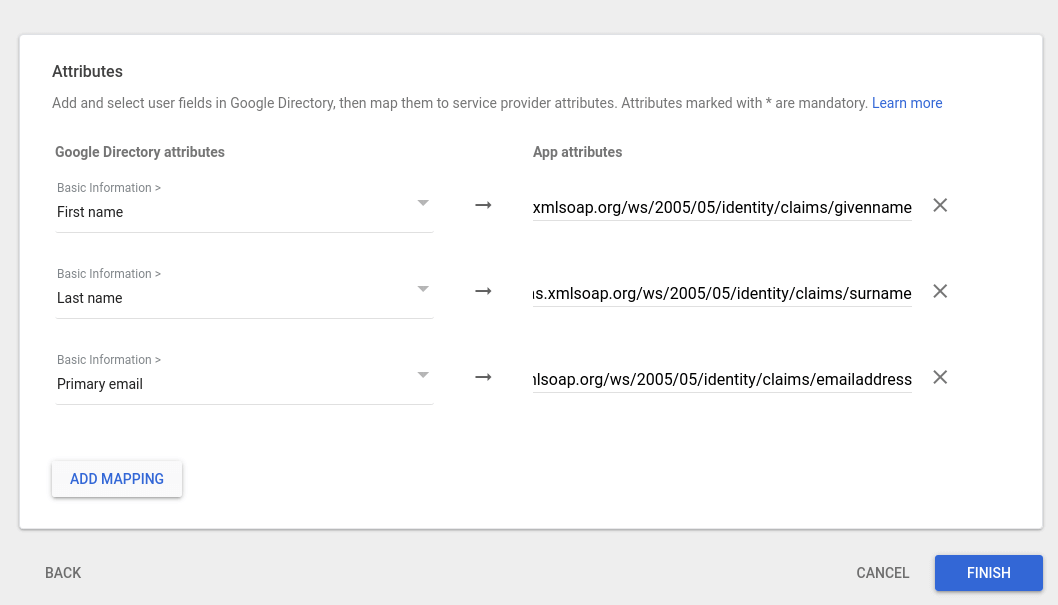
First name = http://schemas.xmlsoap.org/ws/2005/05/identity/claims/givenname Last name = http://schemas.xmlsoap.org/ws/2005/05/identity/claims/surname Primary email = http://schemas.xmlsoap.org/ws/2005/05/identity/claims/emailaddress
settings/auth/socialite
lnms config:set auth.socialite.configs.saml2.metadata "$(cat /tmp/GoogleIDPMetadata.xml)"
Alternatively, you can copy the content of the file and run it like so, this will result in the exact same result as above.
settings/auth/socialite
lnms config:set auth.socialite.configs.saml2.metadata '''<?xml version="1.0" encoding
...
...
</md:EntityDescriptor>'''
echo "SESSION_SAME_SITE=none" >> .env
lnms plugin:add socialiteproviders/saml2
lnms config:set auth.socialite.redirect true
lnms config:set auth.socialite.register true
lnms config:set auth.socialite.configs.saml2.acs https://login.microsoftonline.com/xxxidfromazurexxx/saml2
lnms config:set auth.socialite.configs.saml2.entityid https://sts.windows.net/xxxidfromazurexxx/
lnms config:set auth.socialite.configs.saml2.certificate xxxcertinonelinexxx
lnms config:set auth.socialite.configs.saml2.listener "\SocialiteProviders\Saml2\Saml2ExtendSocialite"
lnms config:set auth.socialite.configs.saml2.metadata https://nexus.microsoftonline-p.com/federationmetadata/saml20/federationmetadata.xml
lnms config:set auth.socialite.configs.saml2.sp_default_binding_method urn:oasis:names:tc:SAML:2.0:bindings:HTTP-POST
lnms config:clear
Using an Identity Provider metadata URL
Note
This is the preferred and easiest way, if your IdP supports it!
settings/auth/socialite
lnms config:set auth.socialite.configs.saml2.metadata https://idp.co/metadata/xml
Using an Identity Provider metadata XML file
settings/auth/socialite
lnms config:set auth.socialite.configs.saml2.metadata "$(cat GoogleIDPMetadata.xml)"
Manually configuring the Identity Provider with a certificate string
settings/auth/socialite
lnms config:set auth.socialite.configs.saml2.acs https://idp.co/auth/acs
lnms config:set auth.socialite.configs.saml2.entityid http://saml.to/trust
lnms config:set auth.socialite.configs.saml2.certificate MIIC4jCCAcqgAwIBAgIQbDO5YO....
Manually configuring the Identity Provider with a certificate file
settings/auth/socialite
lnms config:set auth.socialite.configs.saml2.acs https://idp.co/auth/acs
lnms config:set auth.socialite.configs.saml2.entityid http://saml.to/trust
lnms config:set auth.socialite.configs.saml2.certificate "$(cat /path/to/certificate.pem)"
Add provider event listener
Now we just need to define the listener service within LibreNMS:
settings/auth/socialite
lnms config:set auth.socialite.configs.saml2.listener "\SocialiteProviders\Saml2\Saml2ExtendSocialite"
SESSION_SAME_SITE
You most likely will need to set SESSION_SAME_SITE=none in .env if you use SAML2! If you get an error with http code 419, you should try to remove SESSION_SAME_SITE=none from your .env.
Note
Don't forget to run lnms config:clear after you modify .env to flush the config cache
Service provider metadata
Your identify provider might ask you for your Service Provider (SP) metadata. LibreNMS exposes all of this information from your LibreNMS install
Troubleshooting
If it doesn't work, please double check your configuration values by using the config:get command below.
settings/auth/socialite
lnms config:get auth.socialite
Redirect URL
If you have a need to, then you can override redirect url with the following commands:
Replace github and the relevant URL below with your identity provider details. lnms config:set auth.socialite.configs.github.redirect https://demo.librenms.org/auth/github/callback
lnms config:set auth.socialite.configs.saml2.sp_acs auth/saml2/callback
Post configuration settings
settings/auth/socialite
From here you can configure the settings for any identity providers you have configured along with some bespoke options.
Redirect Login page: This setting will skip your LibreNMS login and take the end user straight to the first idP you configured.
Allow registration via provider: If this setting is disabled, new users signing in via the idP will not be authenticated. This setting allows a local user to be automatically created which permits their login.