Applications
You can use Application support to graph performance statistics of many applications.
Different applications support a variety of ways to collect data:
- By direct connection to the application
- snmpd extend
- The agent.
The monitoring of applications could be added before or after the hosts have been added to LibreNMS.
If multiple methods of collection are listed you only need to enable one.
SNMP Extend
When using the snmp extend method, the application discovery module will pick up which applications you have set up for monitoring automatically, even if the device is already in LibreNMS. The application discovery module is enabled by default for most *nix operating systems, but in some cases you will need to manually enable the application discovery module.
SUDO
One major thing to keep in mind when using SNMP extend is these run as the snmpd user that can be an unprivileged user. In these situations you need to use sudo.
To test if you need sudo, first check the user snmpd is running as. Then test if you can run the extend script as that user without issue. For example if snmpd is running as 'Debian-snmp' and we want to run the extend for proxmox, we check that the following run without error:
sudo -u Debian-snmp /usr/local/bin/proxmox
If it doesn't work, then you will need to use sudo with the extend command. For the example above, that would mean adding the line below to the sudoers file:
Debian-snmp ALL = NOPASSWD: /usr/local/bin/proxmox
Finally we would need to add sudo to the extend command, which would look like that for proxmox:
extend proxmox /usr/bin/sudo /usr/local/bin/proxmox
JSON Return Optimization Using librenms_return_optimizer
While the json_app_get does allow for more complex and larger data to be easily returned by a extend and the data to then be worked with, this can also sometimes result in large returns that occasionally don't play nice with SNMP on some networks.
librenms_return_optimizer
fixes this via taking the extend output piped to it, gzipping it, and then converting it to base64. The later is needed as net-snmp does not play that nice with binary data, converting most of the non-printable characters to .
. This does add a bit of additional overhead to the gzipped data, but still tends to be result in a return that is usually a third of the size for JSONs items.
The change required is fairly simply. So for the portactivity example below...
extend portactivity /etc/snmp/extends/portactivity smtps,http,imap,imaps,postgresql,https,ldap,ldaps,nfsd,syslog-conn,ssh,matrix,gitea
Would become this...
extend portactivity /usr/local/bin/lnms_return_optimizer -- /etc/snmp/extends/portactivity smtps,http,imap,imaps,postgresql,https,ldap,ldaps,nfsd,syslog-conn,ssh,matrix,gitea
The requirements for this are Perl, MIME::Base64, and Gzip::Faster.
Installing on FreeBSD...
pkg install p5-MIME-Base64 p5-Gzip-Faster wget
wget https://raw.githubusercontent.com/librenms/librenms-agent/master/utils/librenms_return_optimizer -O /usr/local/bin/librenms_return_optimizer
chmod +x /usr/local/bin/librenms_return_optimizer
Installing on Debian...
apt-get install zlib1g-dev cpanminus wget
cpanm Gzip::Faster
cpanm MIME::Base64
wget https://raw.githubusercontent.com/librenms/librenms-agent/master/utils/librenms_return_optimizer -O /usr/local/bin/librenms_return_optimizer
chmod +x /usr/local/bin/librenms_return_optimizer
Currently supported applications as are below.
- backupninja
- certificate
- chronyd
- dhcp-stats
- docker
- fail2ban
- fbsd-nfs-client
- fbsd-nfs-server
- gpsd
- mailcow-postfix
- mdadm
- ntp-client
- ntp-server
- portactivity
- powerdns
- powermon
- puppet-agent
- pureftpd
- redis
- seafile
- supervisord
- ups-apcups
- zfs
The following apps have extends that have native support for this, if congiured to do so.
- suricata
Enable the application discovery module
- Edit the device for which you want to add this support
- Click on the Modules tab and enable the
applications
module. - This will be automatically saved, and you should get a green confirmation pop-up message.
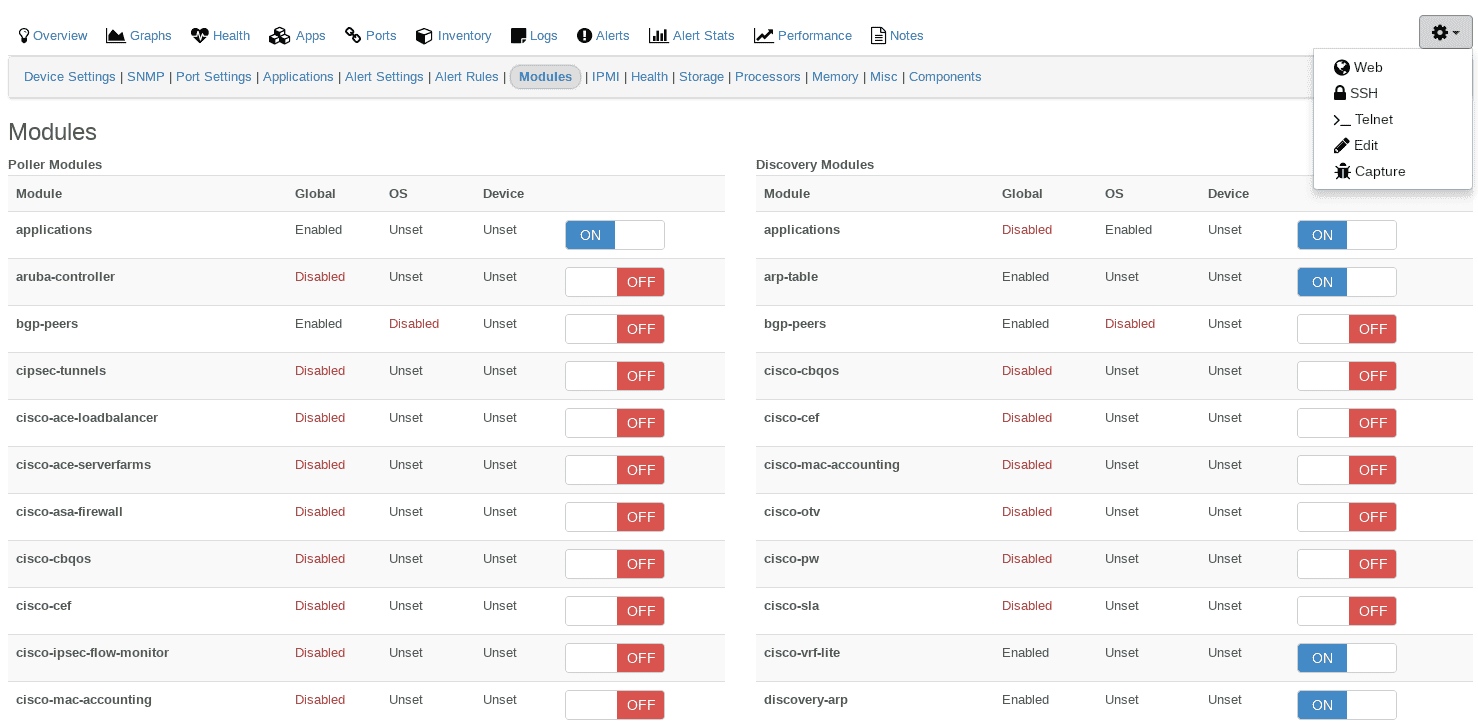
After you have enabled the application module, it would be wise to then also enable which applications you want to monitor, in the rare case where LibreNMS does not automatically detect it.
Note: Only do this if an application was not auto-discovered by LibreNMS during discovery and polling.
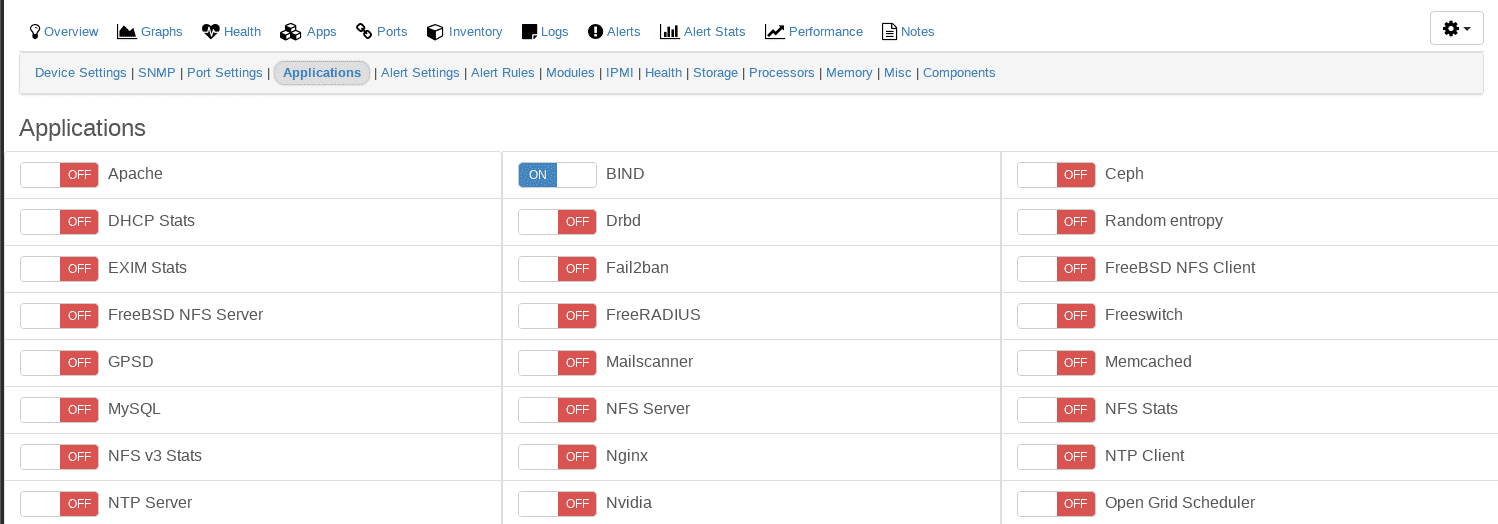
Enable the application(s) to be discovered
- Go to the device you have just enabled the application module for.
- Click on the Applications tab and select the applications you want to monitor.
- This will also be automatically saved, and you should get a green confirmation pop-up message.
Agent
The unix-agent does not have a discovery module, only a poller module. That poller module is always disabled by default. It needs to be manually enabled if using the agent. Some applications will be automatically enabled by the unix-agent poller module. It is better to ensure that your application is enabled for monitoring. You can check by following the steps under the SNMP Extend
heading.
Apache
Either use SNMP extend or use the agent.
Note that you need to install and configure the Apache mod_status module before trying the script.
SNMP Extend
-
Download the script onto the desired host (the host must be added to LibreNMS devices)
wget https://raw.githubusercontent.com/librenms/librenms-agent/master/snmp/apache-stats.py -O /etc/snmp/apache-stats.py
-
Make the script executable
chmod +x /etc/snmp/apache-stats.py
-
Create the cache directory, '/var/cache/librenms/' and make sure that it is owned by the user running the SNMP daemon.
mkdir -p /var/cache/librenms/
-
Verify it is working by running /etc/snmp/apache-stats.py Package
urllib3
for python3 needs to be installed. In Debian-based systems for example you can achieve this by issuing:apt-get install python3-urllib3
-
Edit your snmpd.conf file (usually /etc/snmp/snmpd.conf) and add:
extend apache /etc/snmp/apache-stats.py
-
Restart snmpd on your host
-
Test by running
snmpwalk <various options depending on your setup> localhost NET-SNMP-EXTEND-MIB::nsExtendOutput2Table
Agent
Install the agent on this device if it isn't already and copy the apache
script to /usr/lib/check_mk_agent/local/
-
Verify it is working by running /usr/lib/check_mk_agent/local/apache (If you get error like "Can't locate LWP/Simple.pm". libwww-perl needs to be installed: apt-get install libwww-perl)
-
Create the cache directory, '/var/cache/librenms/' and make sure that it is owned by the user running the SNMP daemon.
mkdir -p /var/cache/librenms/
-
On the device page in Librenms, edit your host and check the
Apache
under the Applications tab.
Asterisk
A small shell script that reports various Asterisk call status.
SNMP Extend
-
Download the asterisk script to
/etc/snmp/
on your asterisk server.wget https://raw.githubusercontent.com/librenms/librenms-agent/master/snmp/asterisk -O /etc/snmp/asterisk
-
Make the script executable
chmod +x /etc/snmp/asterisk
-
Configure
ASCLI
in the script. -
Verify it is working by running
/etc/snmp/asterisk
-
Edit your snmpd.conf file (usually
/etc/snmp/snmpd.conf
) and add:extend asterisk /etc/snmp/asterisk
-
Restart snmpd on your host
The application should be auto-discovered as described at the top of the page. If it is not, please follow the steps set out under SNMP Extend
heading top of page.
backupninja
A small shell script that reports status of last backupninja backup.
SNMP Extend
- Download the backupninja script to
/etc/snmp/backupninja.py
on your backuped server.wget https://raw.githubusercontent.com/librenms/librenms-agent/master/snmp/backupninja.py -O /etc/snmp/backupninja.py`
-
Make the script executable:
chmod +x /etc/snmp/backupninja.py
-
Edit your snmpd.conf file (usually
/etc/snmp/snmpd.conf
) and add:extend backupninja /etc/snmp/backupninja.py
-
Restart snmpd on your host
BIND9 aka named
-
Create stats file with appropriate permissions:
Change~$ touch /var/cache/bind/stats ~$ chown bind:bind /var/cache/bind/stats
user:group
to the user and group that's running bind/named. -
Bind/named configuration:
options { ... statistics-file "/var/cache/bind/stats"; zone-statistics yes; ... };
-
Restart your bind9/named after changing the configuration.
-
Verify that everything works by executing
rndc stats && cat /var/cache/bind/stats
. In case you get aPermission Denied
error, make sure you changed the ownership correctly. -
Also be aware that this file is appended to each time
rndc stats
is called. Given this it is suggested you setup file rotation for it. Alternatively you can also set zero_stats to 1 in the config. -
The script for this also requires the Perl module
File::ReadBackwards
.FreeBSD => p5-File-ReadBackwards CentOS/RedHat => perl-File-ReadBackwards Debian/Ubuntu => libfile-readbackwards-perl
If it is not available, it can be installed by cpan -i File::ReadBackwards
.
- You may possibly need to configure the agent/extend script as well.
The config file's path defaults to the same path as the script, but with .config appended. So if the script is located at /etc/snmp/bind
, the config file will be /etc/snmp/bind.config
. Alternatively you can also specify a config via -c $file
.
Anything starting with a # is comment. The format for variables are $variable=$value. Empty lines are ignored. Spaces and tabs at either the start or end of a line are ignored.
Content of an example /etc/snmp/bind.config . Please edit with your own settings.
rndc = The path to rndc. Default: /usr/bin/env rndc
call_rndc = A 0/1 boolean on whether or not to call rndc stats.
Suggest to set to 0 if using netdata. Default: 1
stats_file = The path to the named stats file. Default: /var/cache/bind/stats
agent = A 0/1 boolean for if this is being used as a LibreNMS
agent or not. Default: 0
zero_stats = A 0/1 boolean for if the stats file should be zeroed
first. Default: 0 (1 if guessed)
If you want to guess at the configuration, call the script with -g
and it will print out what it thinks it should be.
SNMP Extend
-
Copy the bind shell script, to the desired host.
wget https://github.com/librenms/librenms-agent/raw/master/snmp/bind -O /etc/snmp/bind
-
Make the script executable
chmod +x /etc/snmp/bind
-
Edit your snmpd.conf file and add:
extend bind /etc/snmp/bind
-
Restart snmpd on the host in question.
The application should be auto-discovered as described at the top of the page. If it is not, please follow the steps set out under SNMP Extend
heading top of page.
Agent
-
Install the agent on this device if it isn't already and copy the script to
/usr/lib/check_mk_agent/local/bind
viawget https://raw.githubusercontent.com/librenms/librenms-agent/master/snmp/bind -O /usr/lib/check_mk_agent/local/bind
-
Make the script executable
chmod +x /usr/lib/check_mk_agent/local/bind
-
Set the variable 'agent' to '1' in the config.
Certificate
A small python3 script that checks age and remaining validity of certificates
This script needs following packages on Debian/Ubuntu Systems:
- python3
- python3-openssl
Content of an example /etc/snmp/certificate.json . Please edit with your own settings.
{"domains": [
{"fqdn": "www.mydomain.com"},
{"fqdn": "some.otherdomain.org",
"port": 8443},
{"fqdn": "personal.domain.net"},
{"fqdn": "selfsignedcert_host.domain.com",
"cert_location": "/etc/pki/tls/certs/localhost.pem"}
]
}
SNMP Extend
-
Copy the shell script to the desired host.
wget https://raw.githubusercontent.com/librenms/librenms-agent/master/snmp/certificate.py -O /etc/snmp/certificate.py
-
Make the script executable
chmod +x /etc/snmp/certificate.py
-
Edit your snmpd.conf file (usually /etc/snmp/snmpd.conf) and add:
extend certificate /etc/snmp/certificate.py
- Restart snmpd on your host
The application should be auto-discovered as described at the top of the page. If it is not, please follow the steps set out under SNMP Extend
heading top of page.
CAPEv2
-
Copy the shell script to the desired host.
wget https://raw.githubusercontent.com/librenms/librenms-agent/master/snmp/cape -O /etc/snmp/cape
-
Make the script executable
chmod +x /etc/snmp/cape
-
Edit your snmpd.conf file (usually /etc/snmp/snmpd.conf) and add:
extend cape /etc/snmp/cape
-
Install the required packages.
apt-get install libfile-readbackwards-perl libjson-perl libconfig-tiny-perl libdbi-perl libfile-slurp-perl libstatistics-lite-perl
-
Restart snmpd on your host
The application should be auto-discovered as described at the top of the page. If it is not, please follow the steps set out under SNMP Extend
heading top of page.
C.H.I.P
C.H.I.P. is a $9 R8 based tiny computer ideal for small projects. Further details: https://getchip.com/pages/chip
-
Copy the shell script to the desired host.
wget https://raw.githubusercontent.com/librenms/librenms-agent/master/snmp/chip.sh -O /etc/snmp/power-stat.sh
-
Make the script executable
chmod +x /etc/snmp/power-stat.sh
-
Edit your snmpd.conf file (usually /etc/snmp/snmpd.conf) and add:
extend power-stat /etc/snmp/power-stat.sh
-
Restart snmpd on your host
The application should be auto-discovered as described at the top of the page. If it is not, please follow the steps set out under SNMP Extend
heading top of page.
Docker Stats
It gathers metrics about the docker containers, including: - cpu percentage - memory usage - container size - uptime - Totals per status
This script requires python3 and the pip module python-dateutil
SNMP Extend
-
Install pip module
pip3 install python-dateutil
-
Copy the shell script to the desired host. By default, it will only show the status for containers that are running. To include all containers modify the constant in the script at the top of the file and change it to
ONLY_RUNNING_CONTAINERS = False
wget https://github.com/librenms/librenms-agent/raw/master/snmp/docker-stats.py -O /etc/snmp/docker-stats.py
-
Make the script executable
chmod +x /etc/snmp/docker-stats.py
-
Edit your snmpd.conf file (usually /etc/snmp/snmpd.conf) and add:
extend docker /etc/snmp/docker-stats.py
-
If your run Debian, you need to add the Debian-snmp user to the docker group
usermod -a -G docker Debian-snmp
-
Restart snmpd on your host
systemctl restart snmpd
Entropy
A small shell script that checks your system's available random entropy.
SNMP Extend
-
Download the script onto the desired host.
wget https://raw.githubusercontent.com/librenms/librenms-agent/master/snmp/entropy.sh -O /etc/snmp/entropy.sh
-
Make the script executable
chmod +x /etc/snmp/entropy.sh
-
Edit your snmpd.conf file (usually /etc/snmp/snmpd.conf) and add:
extend entropy /etc/snmp/entropy.sh
-
Restart snmpd on your host
The application should be auto-discovered as described at the top of the page. If it is not, please follow the steps set out under SNMP Extend
heading top of page.
EXIM Stats
SNMP extend script to get your exim stats data into your host.
SNMP Extend
-
Download the script onto the desired host.
wget https://raw.githubusercontent.com/librenms/librenms-agent/master/snmp/exim-stats.sh -O /etc/snmp/exim-stats.sh
-
Make the script executable
chmod +x /etc/snmp/exim-stats.sh
-
Edit your snmpd.conf file (usually
/etc/snmp/snmpd.conf
) and add:extend exim-stats /etc/snmp/exim-stats.sh
-
If you are using sudo edit your sudo users (usually
visudo
) and add at the bottom:snmp ALL=(ALL) NOPASSWD: /etc/snmp/exim-stats.sh, /usr/bin/exim*
-
Restart snmpd on your host
The application should be auto-discovered as described at the top of the page. If it is not, please follow the steps set out under SNMP Extend
heading top of page.
Fail2ban
SNMP Extend
-
Copy the shell script, fail2ban, to the desired host.
wget https://github.com/librenms/librenms-agent/raw/master/snmp/fail2ban -O /etc/snmp/fail2ban
-
Make the script executable
chmod +x /etc/snmp/fail2ban
-
Edit your snmpd.conf file (usually /etc/snmp/snmpd.conf) and add:
extend fail2ban /etc/snmp/fail2ban
-
If you want to use the cache, it is as below, by using the -c switch.
extend fail2ban /etc/snmp/fail2ban -c
-
If you want to use the cache and update it if needed, this can by using the -c and -U switches.
extend fail2ban /etc/snmp/fail2ban -c -U
-
If you need to specify a custom location for the fail2ban-client, that can be done via the -f switch.
If not specified, "/usr/bin/env fail2ban-client" is used.extend fail2ban /etc/snmp/fail2ban -f /foo/bin/fail2ban-client
-
-
Restart snmpd on your host
-
If you wish to use caching, add the following to /etc/crontab and restart cron.
*/3 * * * * root /etc/snmp/fail2ban -u
-
Restart or reload cron on your system.
If you have more than a few jails configured, you may need to use caching as each jail needs to be polled and fail2ban-client can't do so in a timely manner for than a few. This can result in failure of other SNMP information being polled.
For additional details of the switches, please see the POD in the script it self at the top.
FreeBSD NFS Client
SNMP Extend
-
Copy the shell script, fbsdnfsserver, to the desired host
wget https://github.com/librenms/librenms-agent/raw/master/snmp/fbsdnfsclient -O /etc/snmp/fbsdnfsclient
-
Make the script executable
chmod +x /etc/snmp/fbsdnfsclient
-
Edit your snmpd.conf file and add:
extend fbsdnfsclient /etc/snmp/fbsdnfsclient
-
Restart snmpd on your host
The application should be auto-discovered as described at the top of the page. If it is not, please follow the steps set out under SNMP Extend
heading top of page.
FreeBSD NFS Server
SNMP Extend
-
Copy the shell script, fbsdnfsserver, to the desired host
wget https://github.com/librenms/librenms-agent/raw/master/snmp/fbsdnfsserver -O /etc/snmp/fbsdnfsserver
-
Make the script executable
chmod +x /etc/snmp/fbsdnfsserver
-
Edit your snmpd.conf file and add:
extend fbsdnfsserver /etc/snmp/fbsdnfsserver
-
Restart snmpd on your host
The application should be auto-discovered as described at the top of the page. If it is not, please follow the steps set out under SNMP Extend
heading top of page.
FreeRADIUS
The FreeRADIUS application extension requires that status_server be enabled in your FreeRADIUS config. For more information see: https://wiki.freeradius.org/config/Status
You should note that status requests increment the FreeRADIUS request stats. So LibreNMS polls will ultimately be reflected in your stats/charts.
-
Go to your FreeRADIUS configuration directory (usually /etc/raddb or /etc/freeradius).
-
cd sites-enabled
-
ln -s ../sites-available/status status
-
Restart FreeRADIUS.
-
You should be able to test with the radclient as follows...
echo "Message-Authenticator = 0x00, FreeRADIUS-Statistics-Type = 31, Response-Packet-Type = Access-Accept" | \ radclient -x localhost:18121 status adminsecret
Note that adminsecret is the default secret key in status_server. Change if you've modified this.
SNMP Extend
-
Copy the freeradius shell script, to the desired host.
wget https://raw.githubusercontent.com/librenms/librenms-agent/master/snmp/freeradius.sh -O /etc/snmp/freeradius.sh
-
Make the script executable
chmod +x /etc/snmp/freeradius.sh
-
If you've made any changes to the FreeRADIUS status_server config (secret key, port, etc.) edit freeradius.sh and adjust the config variable accordingly.
-
Edit your snmpd.conf file and add:
extend freeradius /etc/snmp/freeradius.sh
-
Restart snmpd on the host in question.
The application should be auto-discovered as described at the top of the page. If it is not, please follow the steps set out under SNMP Extend
heading top of page.
Agent
-
Install the script to your agent
wget https://raw.githubusercontent.com/librenms/librenms-agent/master/snmp/freeradius.sh -O /usr/lib/check_mk_agent/local/freeradius.sh`
-
Make the script executable
chmod +x /usr/lib/check_mk_agent/local/freeradius.sh
-
If you've made any changes to the FreeRADIUS status_server config (secret key, port, etc.) edit freeradius.sh and adjust the config variable accordingly.
-
Edit the freeradius.sh script and set the variable 'AGENT' to '1' in the config.
Freeswitch
A small shell script that reports various Freeswitch call status.
Agent
-
Install the agent on this device if it isn't already and copy the
freeswitch
script to/usr/lib/check_mk_agent/local/
wget https://raw.githubusercontent.com/librenms/librenms-agent/master/agent-local/freeswitch -O /usr/lib/check_mk_agent/local/freeswitch`
-
Make the script executable
chmod +x /usr/lib/check_mk_agent/local/freeswitch
-
Configure
FSCLI
in the script. You may also have to create an/etc/fs_cli.conf
file if yourfs_cli
command requires authentication. -
Verify it is working by running
/usr/lib/check_mk_agent/local/freeswitch
SNMP Extend
-
Download the script onto the desired host
wget https://github.com/librenms/librenms-agent/raw/master/agent-local/freeswitch -O /etc/snmp/freeswitch
-
Make the script executable
chmod +x /etc/snmp/freeswitch
-
Configure
FSCLI
in the script. You may also have to create an/etc/fs_cli.conf
file if yourfs_cli
command requires authentication. -
Verify it is working by running
/etc/snmp/freeswitch
-
Edit your snmpd.conf file (usually
/etc/snmp/snmpd.conf
) and add:extend freeswitch /etc/snmp/freeswitch
-
Restart snmpd on your host
The application should be auto-discovered as described at the top of the page. If it is not, please follow the steps set out under SNMP Extend
heading top of page.
GPSD
SNMP Extend
-
Download the script onto the desired host.
wget https://raw.githubusercontent.com/librenms/librenms-agent/master/snmp/gpsd -O /etc/snmp/gpsd
-
Make the script executable
chmod +x /etc/snmp/gpsd
-
Edit your snmpd.conf file (usually
/etc/snmp/snmpd.conf
) and add:extend gpsd /etc/snmp/gpsd
-
Restart snmpd on your host
The application should be auto-discovered as described at the top of the page. If it is not, please follow the steps set out under SNMP Extend
heading at the top of the page.
Agent
Install the agent on this device if it isn't already and copy the gpsd
script to /usr/lib/check_mk_agent/local/
You may need to configure $server
or $port
.
Verify it is working by running /usr/lib/check_mk_agent/local/gpsd
HV Monitor
HV Monitor provides a generic way to monitor hypervisors. Currently CBSD+bhyve on FreeBSD and Libvirt+QEMU on Linux are support.
For more information see HV::Monitor on Github or MetaCPAN.
SNMP Extend
- Install the SNMP Extend.
For Debian based systems this is as below.
apt-get install zlib1g-dev cpanminus libjson-perl
cpanm HV::Monitor
And on FreeBSD as below.
pkg install p5-App-cpanminus p5-JSON p5-MIME-Base64 p5-Gzip-Faster
cpanm HV::Monitor
- Set it up to be be ran by cron by root. Yes, you can directly call this script from SNMPD, but be aware, especially with Libvirt, there is a very real possibility of the snmpget timing out, especially if a VM is spinning up/down as virsh domstats can block for a few seconds or so then.
*/5 * * * * /usr/local/bin/hv_monitor > /var/cache/hv_monitor.json -c 2> /dev/null
- Setup snmpd.conf as below.
extend hv-monitor /bin/cat
/var/cache/hv_monitor.json
-
Restart SNMPD.
-
Either wait for it to be re-discovered or manually enable it.
Icecast
Shell script that reports load average/memory/open-files stats of Icecast
SNMP Extend
-
Copy the shell script, icecast-stats.sh, to the desired host (the host must be added to LibreNMS devices)
wget https://github.com/librenms/librenms-agent/raw/master/snmp/icecast-stats.sh -O /etc/snmp/icecast-stats.sh
-
Make the script executable
chmod +x /etc/snmp/icecast-stats.sh
-
Verify it is working by running
/etc/snmp/icecast-stats.sh
-
Edit your snmpd.conf file (usually
/etc/snmp/icecast-stats.sh
) and add:extend icecast /etc/snmp/icecast-stats.sh
ISC DHCP Stats
A small python3 script that reports current DHCP leases stats and pool usage of ISC DHCP Server.
Also you have to install the dhcpd-pools Package. Under Ubuntu/Debian just run apt install dhcpd-pools
SNMP Extend
-
Copy the shell script to the desired host.
wget https://github.com/librenms/librenms-agent/raw/master/snmp/dhcp.py -O /etc/snmp/dhcp.py
-
Make the script executable
chmod +x /etc/snmp/dhcp.py
-
Edit your config file, Content of an example /etc/snmp/dhcp.json
Key 'leasefile' specifies the path to your lease file.{"leasefile": "/var/lib/dhcp/dhcpd.leases" }
-
Edit your snmpd.conf file (usually /etc/snmp/snmpd.conf) and add:
extend dhcpstats /etc/snmp/dhcp.py
-
Restart snmpd on your host
The application should be auto-discovered as described at the top of the page. If it is not, please follow the steps set out under SNMP Extend
heading top of page.
linux_config_files
linux_config_files is an application intended to monitor a Linux distribution's configuration files via that distribution's configuration management tool/system. At this time, ONLY RPM-based (Fedora/RHEL) SYSTEMS ARE SUPPORTED utilizing the rpmconf tool. The linux_config_files application collects and graphs the total count of configuration files that are out of sync and graphs that number.
Fedora/RHEL: Rpmconf is a utility that analyzes rpm configuration files using the RPM Package Manager. Rpmconf reports when a new configuration file standard has been issued for an upgraded/downgraded piece of software. Typically, rpmconf is used to provide a diff of the current configuration file versus the new, standard configuration file. The administrator can then choose to install the new configuration file or keep the old one.
SNMP Extend
-
Copy the python script, linux_config_files.py, to the desired host
wget https://github.com/librenms/librenms-agent/raw/master/snmp/linux_config_files.py -O /etc/snmp/linux_config_files.py
-
Make the script executable
chmod +x /etc/snmp/linux_config_files.py
-
Edit your snmpd.conf file and add:
extend linux_config_files /etc/snmp/linux_config_files.py
-
(Optional on an RPM-based distribution) Create a /etc/snmp/linux_config_files.json file and specify the following: a.) "pkg_system" - String designating the distribution name of the system. At the moment only "rpm" is supported ["rpm"] b.) "pkg_tool_cmd" - String path to the package tool binary ["/sbin/rpmconf"]
{ "pkg_system": "rpm", "pkg_tool_cmd": "/bin/rpmconf", }
-
Restart snmpd.
mailcow-dockerized postfix
SNMP Extend
-
Download the script into the desired host.
wget https://raw.githubusercontent.com/librenms/librenms-agent/master/snmp/mailcow-dockerized-postfix -O /etc/snmp/mailcow-dockerized-postfix
-
Make the script executable
chmod +x /etc/snmp/mailcow-dockerized-postfix
Maybe you will need to install
pflogsumm
on debian based OS. Please check if you have package installed. -
Edit your snmpd.conf file (usually /etc/snmp/snmpd.conf) and add:
extend mailcow-postfix /etc/snmp/mailcow-dockerized-postfix
-
Restart snmpd on your host
The application should be auto-discovered as described at the top of the page. If it is not, please follow the steps set out under SNMP Extend
heading top of page.
Mailscanner
SNMP Extend
-
Download the script onto the desired host.
wget https://raw.githubusercontent.com/librenms/librenms-agent/master/snmp/mailscanner.php -O /etc/snmp/mailscanner.php
-
Make the script executable
chmod +x /etc/snmp/mailscanner.php
-
Edit your snmpd.conf file (usually /etc/snmp/snmpd.conf) and add:
extend mailscanner /etc/snmp/mailscanner.php
-
Restart snmpd on your host
The application should be auto-discovered as described at the top of the page. If it is not, please follow the steps set out under SNMP Extend
heading top of page.
Mdadm
It allows you to checks mdadm health and array data
This script require: jq
SNMP Extend
-
Install jq
sudo apt install jq
-
Download the script onto the desired host.
sudo wget https://raw.githubusercontent.com/librenms/librenms-agent/master/snmp/mdadm -O /etc/snmp/mdadm
-
Make the script executable
sudo chmod +x /etc/snmp/mdadm
-
Edit your snmpd.conf file (usually /etc/snmp/snmpd.conf) and add:
extend mdadm /etc/snmp/mdadm
-
Verify it is working by running
sudo /etc/snmp/mdadm
-
Restart snmpd on your host
sudo service snmpd restart
The application should be auto-discovered as described at the top of the page. If it is not, please follow the steps set out under SNMP Extend
heading top of page.
MegaRAID
This software from Broadcom/LSI let you monitor MegaRAID controller.
-
Download the external software and follow the included install instructions.
-
Add the following line to your snmpd.conf file (usually /etc/snmp/snmpd.conf)
pass .1.3.6.1.4.1.3582 /usr/sbin/lsi_mrdsnmpmain
-
Restart snmpd on your host
Memcached
SNMP Extend
-
Copy the memcached script to
/etc/snmp/
on your remote server.wget https://raw.githubusercontent.com/librenms/librenms-agent/master/snmp/memcached -O /etc/snmp/memcached
-
Make the script executable:
chmod +x /etc/snmp/memcached
-
Edit your snmpd.conf file (usually
/etc/snmp/snmpd.conf
) and add:extend memcached /etc/snmp/memcached
-
Restart snmpd on your host
The application should be auto-discovered as described at the top of the page. If it is not, please follow the steps set out under SNMP Extend
heading top of page.
Munin
Agent
-
Install the script to your agent:
wget https://raw.githubusercontent.com/librenms/librenms-agent/master/agent-local/munin -O /usr/lib/check_mk_agent/local/munin
-
Make the script executable
chmod +x /usr/lib/check_mk_agent/local/munin
-
Create the munin scripts dir:
mkdir -p /usr/share/munin/munin-scripts
-
Install your munin scripts into the above directory.
To create your own custom munin scripts, please see this example:
#!/bin/bash
if [ "$1" = "config" ]; then
echo 'graph_title Some title'
echo 'graph_args --base 1000 -l 0' #not required
echo 'graph_vlabel Some label'
echo 'graph_scale no' #not required, can be yes/no
echo 'graph_category system' #Choose something meaningful, can be anything
echo 'graph_info This graph shows something awesome.' #Short desc
echo 'foobar.label Label for your unit' # Repeat these two lines as much as you like
echo 'foobar.info Desc for your unit.'
exit 0
fi
echo -n "foobar.value " $(date +%s) #Populate a value, here unix-timestamp
MySQL
Create the cache directory, '/var/cache/librenms/' and make sure that it is owned by the user running the SNMP daemon.
mkdir -p /var/cache/librenms/
The MySQL script requires PHP-CLI and the PHP MySQL extension, so please verify those are installed.
CentOS (May vary based on PHP version)
yum install php-cli php-mysql
Debian (May vary based on PHP version)
apt-get install php-cli php-mysql
Unlike most other scripts, the MySQL script requires a configuration file mysql.cnf
in the same directory as the extend or agent script with following content:
<?php
$mysql_user = 'root';
$mysql_pass = 'toor';
$mysql_host = 'localhost';
$mysql_port = 3306;
Note that depending on your MySQL installation (chrooted install for example), you may have to specify 127.0.0.1 instead of localhost. Localhost make a MySQL connection via the mysql socket, while 127.0.0.1 make a standard IP connection to mysql.
Note also if you get a mysql error Uncaught TypeError: mysqli_num_rows(): Argument #1
, this is because you are using a newer mysql version which doesnt support UNBLOCKING
for slave statuses, so you need to also include the line $chk_options['slave'] = false;
into mysql.cnf
to skip checking slave statuses
Agent
Install the agent on this device if it isn't already
and copy the mysql
script to /usr/lib/check_mk_agent/local/
Verify it is working by running /usr/lib/check_mk_agent/local/mysql
SNMP extend
-
Copy the mysql script to the desired host.
wget https://github.com/librenms/librenms-agent/raw/master/snmp/mysql -O /etc/snmp/mysql
-
Make the file executable
chmod +x /etc/snmp/mysql
-
Edit /etc/snmp/mysql to set your MySQL connection constants or declare them in /etc/snmp/mysql.cnf (new file)
-
Edit your snmpd.conf file and add:
extend mysql /etc/snmp/mysql
-
Restart snmpd.
The application should be auto-discovered as described at the top of the page. If it is not, please follow the steps set out under SNMP Extend
heading top of page.
NGINX
NGINX is a free, open-source, high-performance HTTP server: https://www.nginx.org/
It's required to have the following directive in your nginx configuration responsible for the localhost server:
location /nginx-status {
stub_status on;
access_log off;
allow 127.0.0.1;
allow ::1;
deny all;
}
SNMP Extend
-
Download the script onto the desired host.
wget https://raw.githubusercontent.com/librenms/librenms-agent/master/snmp/nginx -O /etc/snmp/nginx
-
Make the script executable
chmod +x /etc/snmp/nginx
-
Edit your snmpd.conf file (usually /etc/snmp/snmpd.conf) and add:
extend nginx /etc/snmp/nginx
-
(Optional) If you have SELinux in Enforcing mode, you must add a module so the script can request /nginx-status:
cat << EOF > snmpd_nginx.te module snmpd_nginx 1.0; require { type httpd_t; type http_port_t; type snmpd_t; class tcp_socket name_connect; } #============= snmpd_t ============== allow snmpd_t http_port_t:tcp_socket name_connect; EOF checkmodule -M -m -o snmpd_nginx.mod snmpd_nginx.te semodule_package -o snmpd_nginx.pp -m snmpd_nginx.mod semodule -i snmpd_nginx.pp
-
Restart snmpd on your host
The application should be auto-discovered as described at the top of the page. If it is not, please follow the steps set out under SNMP Extend
heading top of page.
Agent
Install the agent on this device if it isn't already and copy the nginx
script to /usr/lib/check_mk_agent/local/
NFS Server
Export the NFS stats from as server.
SNMP Extend
-
Edit your snmpd.conf file (usually /etc/snmp/snmpd.conf) and add :
extend nfs-server /bin/cat /proc/net/rpc/nfsd
find out where cat is located using :
which cat
-
reload snmpd service to activate the configuration
NTP Client
A shell script that gets stats from ntp client.
SNMP Extend
-
Download the script onto the desired host.
wget https://raw.githubusercontent.com/librenms/librenms-agent/master/snmp/ntp-client -O /etc/snmp/ntp-client
-
Make the script executable
chmod +x /etc/snmp/ntp-client
-
Edit your snmpd.conf file (usually /etc/snmp/snmpd.conf) and add:
extend ntp-client /etc/snmp/ntp-client
-
Restart snmpd on your host
The application should be auto-discovered as described at the top of the page. If it is not, please follow the steps set out under SNMP Extend
heading top of page.
NTP Server aka NTPD
A shell script that gets stats from ntp server (ntpd).
SNMP Extend
-
Download the script onto the desired host.
wget https://raw.githubusercontent.com/librenms/librenms-agent/master/snmp/ntp-server.sh -O /etc/snmp/ntp-server.sh
-
Make the script executable
chmod +x /etc/snmp/ntp-server.sh
-
Edit your snmpd.conf file (usually /etc/snmp/snmpd.conf) and add:
extend ntp-server /etc/snmp/ntp-server.sh
-
Restart snmpd on your host
The application should be auto-discovered as described at the top of the page. If it is not, please follow the steps set out under SNMP Extend
heading top of page.
Chronyd
A shell script that gets the stats from chronyd and exports them with SNMP Extend.
SNMP Extend
-
Download the shell script onto the desired host
wget https://raw.githubusercontent.com/librenms/librenms-agent/master/snmp/chrony -O /etc/snmp/chrony
-
Make the script executable
chmod +x /etc/snmp/chrony
-
Edit the snmpd.conf file to include the extend by adding the following line to the end of the config file:
extend chronyd /etc/snmp/chrony
Note: Some distributions need sudo-permissions for the script to work with SNMP Extend. See the instructions on the section SUDO for more information.
- Restart snmpd service on the host
Application should be auto-discovered and its stats presented on the Apps-page on the host. Note: Applications module needs to be enabled on the host or globally for the statistics to work as intended.
Nvidia GPU
SNMP Extend
-
Copy the shell script, nvidia, to the desired host
wget https://github.com/librenms/librenms-agent/raw/master/snmp/nvidia -O /etc/snmp/nvidia
-
Make the script executable
chmod +x /etc/snmp/nvidia
-
Edit your snmpd.conf file and add:
extend nvidia /etc/snmp/nvidia
-
Restart snmpd on your host.
-
Verify you have nvidia-smi installed, which it generally should be if you have the driver from Nvida installed.
The GPU numbering on the graphs will correspond to how the nvidia-smi sees them as being.
For questions about what the various values are/mean, please see the nvidia-smi man file under the section covering dmon.
Opensearch\Elasticsearch
SNMP Extend
-
Download the script onto the desired host.
wget https://raw.githubusercontent.com/librenms/librenms-agent/master/snmp/opensearch -O /etc/snmp/opensearch
-
Make it executable
chmod +x /etc/snmp/opensearch
-
Install the required Perl dependencies.
# FreeBSD pkg install p5-JSON p5-libwww # Debian/Ubuntu apt-get install libjson-perl libwww-perl # cpanm cpanm JSON Libwww
-
Update your snmpd.conf.
extend opensearch /bin/cat /var/cache/opensearch.json
-
Update root crontab with. This is required as it will this will likely time out otherwise. Use
*/1
if you want to have the most recent stats when polled or to*/5
if you just want at exactly a 5 minute interval.*/5 * * * * /etc/snmp/opensearch > /var/cache/opensearch.json
-
Enable it or wait for the device to be re-disocvered.
Open Grid Scheduler
Shell script to track the OGS/GE jobs running on clusters.
SNMP Extend
-
Download the script onto the desired host.
wget https://raw.githubusercontent.com/librenms/librenms-agent/master/agent-local/rocks.sh -O /etc/snmp/rocks.sh
-
Make the script executable
chmod +x /etc/snmp/rocks.sh
-
Edit your snmpd.conf file (usually /etc/snmp/snmpd.conf) and add:
extend ogs /etc/snmp/rocks.sh
-
Restart snmpd.
The application should be auto-discovered as described at the top of the page. If it is not, please follow the steps set out under SNMP Extend
heading top of page.
Opensips
Script that reports load-average/memory/open-files stats of Opensips
SNMP Extend
-
Download the script onto the desired host
wget https://raw.githubusercontent.com/librenms/librenms-agent/master/snmp/opensips-stats.sh -O /etc/snmp/opensips-stats.sh
-
Make the script executable:
chmod +x /etc/snmp/opensips-stats.sh
-
Verify it is working by running
/etc/snmp/opensips-stats.sh
-
Edit your snmpd.conf file (usually
/etc/snmp/snmpd.conf
) and add:extend opensips /etc/snmp/opensips-stats.sh
OS Updates
A small shell script that checks your system package manager for any available updates. Supports apt-get/pacman/yum/zypper package managers.
For pacman users automatically refreshing the database, it is recommended you use an alternative database location --dbpath=/var/lib/pacman/checkupdate
SNMP Extend
-
Download the script onto the desired host.
wget https://raw.githubusercontent.com/librenms/librenms-agent/master/snmp/osupdate -O /etc/snmp/osupdate
-
Make the script executable
chmod +x /etc/snmp/osupdate
-
Edit your snmpd.conf file (usually /etc/snmp/snmpd.conf) and add:
extend osupdate /etc/snmp/osupdate
-
Restart snmpd on your host
Note: apt-get depends on an updated package index. There are several ways to have your system run apt-get update
automatically. The easiest is to create /etc/apt/apt.conf.d/10periodic
and pasting the following in it: APT::Periodic::Update-Package-Lists "1";
. If you have apticron, cron-apt or apt-listchanges installed and configured, chances are that packages are already updated periodically .
The application should be auto-discovered as described at the top of the page. If it is not, please follow the steps set out under SNMP Extend
heading top of page.
Agent
Install the agent on this device if it isn't already and copy the osupdate
script to /usr/lib/check_mk_agent/local/
PHP-FPM
SNMP Extend
-
Copy the shell script, phpfpmsp, to the desired host
wget https://github.com/librenms/librenms-agent/raw/master/snmp/phpfpmsp -O /etc/snmp/phpfpmsp
-
Make the script executable
chmod +x /etc/snmp/phpfpmsp
-
Edit your snmpd.conf file (usually /etc/snmp/snmpd.conf) and add:
extend phpfpmsp /etc/snmp/phpfpmsp
-
Edit /etc/snmp/phpfpmsp to include the status URL for the PHP-FPM pool you are monitoring.
-
Restart snmpd on your host
It is worth noting that this only monitors a single pool. If you want to monitor multiple pools, this won't do it.
The application should be auto-discovered as described at the top of the page. If it is not, please follow the steps set out under SNMP Extend
heading top of page.
Agent
Install the agent on this device if it isn't already and copy the phpfpmsp
script to /usr/lib/check_mk_agent/local/
Pi-hole
SNMP Extend
-
Copy the shell script, pi-hole, to the desired host.
wget https://github.com/librenms/librenms-agent/raw/master/snmp/pi-hole -O /etc/snmp/pi-hole
-
Make the script executable
chmod +x /etc/snmp/pi-hole
-
Edit your snmpd.conf file and add:
extend pi-hole /etc/snmp/pi-hole
-
To get all data you must get your API auth token from Pi-hole server and change the API_AUTH_KEY entry inside the snmp script.
-
Restard snmpd.
The application should be auto-discovered as described at the top of the page. If it is not, please follow the steps set out under SNMP Extend
heading top of page.
Portactivity
SNMP Extend
-
Install missing packages - Ubuntu is shown below.
apt install libparse-netstat-perl apt install libjson-perl
-
Copy the Perl script to the desired host (the host must be added to LibreNMS devices)
wget https://github.com/librenms/librenms-agent/raw/master/snmp/portactivity -O /etc/snmp/portactivity
-
Make the script executable
chmod +x /etc/snmp/portactivity
-
Edit your snmpd.conf file (usually /etc/snmp/snmpd.conf) and add:
extend portactivity /etc/snmp/portactivity -p http,ldap,imap
Will monitor HTTP, LDAP, and IMAP. The -p switch specifies what ports to use. This is a comma seperated list.
These must be found in '/etc/services' or where ever NSS is set to fetch it from. If not, it will throw an error.
If you want to JSON returned by it to be printed in a pretty format use the -P flag.
-
Restart snmpd on your host.
Please note that for only TCP[46] services are supported.
Postfix
SNMP Extend
-
Copy the shell script, postfix-queues, to the desired host
wget https://github.com/librenms/librenms-agent/raw/master/snmp/postfix-queues -O /etc/snmp/postfix-queues
-
Copy the Perl script, postfixdetailed, to the desired host
wget https://github.com/librenms/librenms-agent/raw/master/snmp/postfixdetailed -O /etc/snmp/postfixdetailed
-
Make both scripts executable
chmod +x /etc/snmp/postfixdetailed /etc/snmp/postfix-queues
-
Edit your snmpd.conf file and add:
extend mailq /etc/snmp/postfix-queues extend postfixdetailed /etc/snmp/postfixdetailed
-
Restart snmpd.
-
Install pflogsumm for your OS.
-
Make sure the cache file in /etc/snmp/postfixdetailed is some place that snmpd can write too. This file is used for tracking changes between various values between each time it is called by snmpd. Also make sure the path for pflogsumm is correct.
-
Run /etc/snmp/postfixdetailed to create the initial cache file so you don't end up with some crazy initial starting value. Please note that each time /etc/snmp/postfixdetailed is ran, the cache file is updated, so if this happens in between LibreNMS doing it then the values will be thrown off for that polling period.
The application should be auto-discovered as described at the top of the page. If it is not, please follow the steps set out under SNMP Extend
heading top of page.
NOTE: If using RHEL for your postfix server, qshape must be installed manually as it is not officially supported. CentOs 6 rpms seem to work without issues.
Postgres
SNMP Extend
-
Copy the shell script, postgres, to the desired host
wget https://github.com/librenms/librenms-agent/raw/master/snmp/postgres -O /etc/snmp/postgres
-
Make the script executable
chmod +x /etc/snmp/postgres
-
Edit your snmpd.conf file and add:
extend postgres /etc/snmp/postgres
-
Restart snmpd on your host
-
Install the Nagios check check_postgres.pl on your system: https://github.com/bucardo/check_postgres
-
Verify the path to check_postgres.pl in /etc/snmp/postgres is correct.
-
(Optional) If you wish to change the DB username (default: pgsql), enable the postgres DB in totalling (e.g. set ignorePG to 0, default: 1), or set a hostname for check_postgres.pl to connect to (default: the Unix Socket postgresql is running on), then create the file /etc/snmp/postgres.config with the following contents (note that not all of them need be defined, just whichever you'd like to change):
DBuser=monitoring ignorePG=0 DBhost=localhost
Note that if you are using netdata or the like, you may wish to set ignorePG to 1 or otherwise that total will be very skewed on systems with light or moderate usage.
The application should be auto-discovered as described at the top of the page. If it is not, please follow the steps set out under SNMP Extend
heading top of page.
PowerDNS
An authoritative DNS server: https://www.powerdns.com/auth.html
SNMP Extend
-
Copy the shell script, powerdns.py, to the desired host
wget https://github.com/librenms/librenms-agent/raw/master/snmp/powerdns.py -O /etc/snmp/powerdns.py
-
Make the script executable
chmod +x /etc/snmp/powerdns.py
-
Edit your snmpd.conf file and add:
extend powerdns /etc/snmp/powerdns.py
-
Restart snmpd on your host
The application should be auto-discovered as described at the top of the page. If it is not, please follow the steps set out under SNMP Extend
heading top of page.
Agent
Install the agent on this device if it isn't already and copy the powerdns
script to /usr/lib/check_mk_agent/local/
PowerDNS Recursor
A recursive DNS server: https://www.powerdns.com/recursor.html
Direct
The LibreNMS polling host must be able to connect to port 8082 on the monitored device. The web-server must be enabled, see the Recursor docs: https://doc.powerdns.com/md/recursor/settings/#webserver
Variables
$config['apps']['powerdns-recursor']['api-key']
required, this is defined in the Recursor config
$config['apps']['powerdns-recursor']['port']
numeric, defines the port to connect to PowerDNS Recursor on. The default is 8082
$config['apps']['powerdns-recursor']['https']
true or false, defaults to use http.
SNMP Extend
-
Copy the shell script, powerdns-recursor, to the desired host
wget https://github.com/librenms/librenms-agent/raw/master/snmp/powerdns-recursor -O /etc/snmp/powerdns-recursor
-
Make the script executable
chmod +x /etc/snmp/powerdns-recursor
-
Edit your snmpd.conf file and add:
extend powerdns-recursor /etc/snmp/powerdns-recursor
-
Restart snmpd on your host
The application should be auto-discovered as described at the top of the page. If it is not, please follow the steps set out under SNMP Extend
heading top of page.
Agent
Install the agent on this device if it isn't already and copy the powerdns-recursor
script to /usr/lib/check_mk_agent/local/
This script uses rec_control get-all
to collect stats.
PowerDNS-dnsdist
SNMP Extend
-
Copy the BASH script to the desired host.
wget https://github.com/librenms/librenms-agent/raw/master/snmp/powerdns-dnsdist -O /etc/snmp/powerdns-dnsdist
-
Make the script executable
chmod +x /etc/snmp/powerdns-dnsdist
-
Edit your snmpd.conf file (usually /etc/snmp/snmpd.conf) and add:
extend powerdns-dnsdist /etc/snmp/powerdns-dnsdist
-
Restart snmpd on your host.
The application should be auto-discovered as described at the top of the page. If it is not, please follow the steps set out under SNMP Extend
heading top of page.
PowerMon
PowerMon tracks the power usage on your host and can report on both consumption and cost, using a python script installed on the host.
Currently the script uses one of two methods to determine current power usage:
-
ACPI via libsensors
-
HP-Health (HP Proliant servers only)
The ACPI method is quite unreliable as it is usually only implemented by battery-powered devices, e.g. laptops. YMMV. However, it's possible to support any method as long as it can return a power value, usually in Watts.
TIP: You can achieve this by adding a method and a function for that method to the script. It should be called by getData() and return a dictionary.
Because the methods are unreliable for all hardware, you need to declare to the script which method to use. The are several options to assist with testing, see --help
.
SNMP Extend
Initial setup
-
Download the python script onto the host:
wget https://raw.githubusercontent.com/librenms/librenms-agent/master/snmp/powermon-snmp.py -O /usr/local/bin/powermon-snmp.py
-
Make the script executable:
chmod +x /usr/local/bin/powermon-snmp.py
-
Edit the script and set the cost per kWh for your supply. You must uncomment this line for the script to work:
vi /usr/local/bin/powermon-snmp.py #costPerkWh = 0.15
-
Choose you method below:
-
Install dependencies:
dnf install lm_sensors pip install PySensors
-
Test the script from the command-line. For example:
$ /usr/local/bin/powermon-snmp.py -m sensors -n -p { "meter": { "0": { "reading": 0.0 } }, "psu": {}, "supply": { "rate": 0.15 }, "reading": "0.0" }
If you see a reading of
0.0
it is likely this method is not supported for your system. If not, continue.-
Obtain the hp-health package for your system. Generally there are three options:
- Standalone package from HPE Support
- From the HP Management Component Pack (MCP).
- Included in the HP Service Pack for Proliant (SPP)
-
If you've downloaded the standalone package, install it. For example:
rpm -ivh hp-health-10.91-1878.11.rhel8.x86_64.rpm
-
Check the service is running:
systemctl status hp-health
-
Test the script from the command-line. For example:
$ /usr/local/bin/powermon-snmp.py -m hpasmcli -n -p { "meter": { "1": { "reading": 338.0 } }, "psu": { "1": { "present": "Yes", "redundant": "No", "condition": "Ok", "hotplug": "Supported", "reading": 315.0 }, "2": { "present": "Yes", "redundant": "No", "condition": "FAILED", "hotplug": "Supported" } }, "supply": { "rate": 0.224931 }, "reading": 338.0 }
If you see a reading of
0.0
it is likely this method is not supported for your system. If not, continue.Finishing Up
-
-
Edit your snmpd.conf file (usually
/etc/snmp/snmpd.conf
) and add the following:extend powermon /usr/local/bin/powermon-snmp.py -m hpasmcli
NOTE: Avoid using other script options in the snmpd config as the results may not be interpreted correctly by LibreNMS.
-
Reload your snmpd service:
systemctl reload snmpd
-
You're now ready to enable the application in LibreNMS.
Pwrstatd
Pwrstatd (commonly known as powerpanel) is an application/service available from CyberPower to monitor their PSUs over USB. It is currently capable of reading the status of only one PSU connected via USB at a time. The powerpanel software is available here: https://www.cyberpowersystems.com/products/software/power-panel-personal/
SNMP Extend
-
Copy the python script, pwrstatd.py, to the desired host
wget https://github.com/librenms/librenms-agent/raw/master/snmp/pwrstatd.py -O /etc/snmp/pwrstatd.py
-
Make the script executable
chmod +x /etc/snmp/pwrstatd.py
-
Edit your snmpd.conf file and add:
extend pwrstatd /etc/snmp/pwrstatd.py
-
(Optional) Create a /etc/snmp/pwrstatd.json file and specify the path to the pwrstat executable [the default path is /sbin/pwrstat]:
{ "pwrstat_cmd": "/sbin/pwrstat" }
-
Restart snmpd.
Proxmox
-
For Proxmox 4.4+ install the libpve-apiclient-perl package
apt install libpve-apiclient-perl
-
Download the script onto the desired host
wget https://raw.githubusercontent.com/librenms/librenms-agent/master/agent-local/proxmox -O /usr/local/bin/proxmox
-
Make the script executable
chmod +x /usr/local/bin/proxmox
-
Edit your snmpd.conf file (usually
/etc/snmp/snmpd.conf
) and add:extend proxmox /usr/local/bin/proxmox
-
Note: if your snmpd doesn't run as root, you might have to invoke the script using sudo and modify the "extend" line
extend proxmox /usr/bin/sudo /usr/local/bin/proxmox
after, edit your sudo users (usually visudo
) and add at the bottom:
Debian-snmp ALL=(ALL) NOPASSWD: /usr/local/bin/proxmox
- Restart snmpd on your host
Puppet Agent
SNMP extend script to get your Puppet Agent data into your host.
SNMP Extend
-
Download the script onto the desired host
wget https://raw.githubusercontent.com/librenms/librenms-agent/master/snmp/puppet_agent.py -O /etc/snmp/puppet_agent.py
-
Make the script executable
chmod +x /etc/snmp/puppet_agent.py
-
Edit your snmpd.conf file (usually
/etc/snmp/snmpd.conf
) and add:extend puppet-agent /etc/snmp/puppet_agent.py
The Script needs python3-yaml
package to be installed.
Per default script searches for on of this files:
- /var/cache/puppet/state/last_run_summary.yaml
- /opt/puppetlabs/puppet/cache/state/last_run_summary.yaml
optionally you can add a specific summary file with creating /etc/snmp/puppet.json
{
"agent": {
"summary_file": "/my/custom/path/to/summary_file"
}
}
- Restart snmpd on the host
PureFTPd
SNMP extend script to monitor PureFTPd.
SNMP Extend
-
Download the script onto the desired host
wget https://raw.githubusercontent.com/librenms/librenms-agent/master/snmp/pureftpd.py -O /etc/snmp/pureftpd.py
-
Make the script executable
chmod +x /etc/snmp/pureftpd.py
-
Edit your snmpd.conf file (usually
/etc/snmp/snmpd.conf
) and add:extend pureftpd sudo /etc/snmp/pureftpd.py
-
Edit your sudo users (usually
visudo
) and add at the bottom:or the path where your pure-ftpwho is locatedsnmp ALL=(ALL) NOPASSWD: /etc/snmp/pureftpd.py
-
If pure-ftpwho is not located in /usr/sbin
you will also need to create a config file, which is named
pureftpd.json. The file has to be located in /etc/snmp/.
{"pureftpwho_cmd": "/usr/sbin/pure-ftpwho"
}
- Restart snmpd on your host
Raspberry PI
SNMP extend script to get your PI data into your host.
SNMP Extend
-
Download the script onto the desired host
wget https://raw.githubusercontent.com/librenms/librenms-agent/master/snmp/raspberry.sh -O /etc/snmp/raspberry.sh
-
Make the script executable
chmod +x /etc/snmp/raspberry.sh
-
Edit your snmpd.conf file (usually
/etc/snmp/snmpd.conf
) and add:extend raspberry /usr/bin/sudo /bin/sh /etc/snmp/raspberry.sh
-
Edit your sudo users (usually
visudo
) and add at the bottom:snmp ALL=(ALL) NOPASSWD: /bin/sh /etc/snmp/raspberry.sh
Note: If you are using Raspian, the default user is Debian-snmp
. Change snmp
above to Debian-snmp
. You can verify the user snmpd is using with ps aux | grep snmpd
- Restart snmpd on PI host
Raspberry Pi GPIO Monitor
SNMP extend script to monitor your IO pins or sensor modules connected to your GPIO header.
SNMP Extend
1: Make sure you have wiringpi installed on your Raspberry Pi. In Debian-based systems for example you can achieve this by issuing:
apt-get install wiringpi
2: Download the script to your Raspberry Pi. wget https://raw.githubusercontent.com/librenms/librenms-agent/master/snmp/rpigpiomonitor.php -O /etc/snmp/rpigpiomonitor.php
3: (optional) Download the example configuration to your Raspberry Pi. wget https://raw.githubusercontent.com/librenms/librenms-agent/master/snmp/rpigpiomonitor.ini -O /etc/snmp/rpigpiomonitor.ini
4: Make the script executable: chmod +x /etc/snmp/rpigpiomonitor.php
5: Create or edit your rpigpiomonitor.ini file according to your needs.
6: Check your configuration with rpigpiomonitor.php -validate
7: Edit your snmpd.conf file (usually /etc/snmp/snmpd.conf
) and add:
extend rpigpiomonitor /etc/snmp/rpigpiomonitor.php
8: Restart snmpd on your Raspberry Pi and, if your Raspberry Pi is already present in LibreNMS, perform a manual rediscover.
Redis
Script to monitor your Redis Server
SNMP Extend
-
Download the script onto the desired host
wget https://raw.githubusercontent.com/librenms/librenms-agent/master/snmp/redis.py -O /etc/snmp/redis.py
-
Make the script executable
chmod +x /etc/snmp/redis.py
-
Edit your snmpd.conf file (usually
/etc/snmp/snmpd.conf
) and add:extend redis /etc/snmp/redis.py
-
(Optional) If you have SELinux in Enforcing mode, you must add a module so the script can get redis informations and write them:
cat << EOF > snmpd_redis.te module snmpd_redis 1.0; require { type tmp_t; type redis_port_t; type snmpd_t; class tcp_socket name_connect; class dir { add_name write }; } #============= snmpd_t ============== allow snmpd_t redis_port_t:tcp_socket name_connect; allow snmpd_t tmp_t:dir { write add_name }; EOF checkmodule -M -m -o snmpd_redis.mod snmpd_redis.te semodule_package -o snmpd_redis.pp -m snmpd_redis.mod semodule -i snmpd_redis.pp
Agent
Install the agent on this device if it isn't already and copy the redis
script to /usr/lib/check_mk_agent/local/
RRDCached
Install/Setup: For Install/Setup Local Librenms RRDCached: Please see RRDCached
Will collect stats by: 1. Connecting directly to the associated device on port 42217 2. Monitor thru snmp with SNMP extend, as outlined below 3. Connecting to the rrdcached server specified by the rrdcached
setting
SNMP extend script to monitor your (remote) RRDCached via snmp
SNMP Extend
-
Download the script onto the desired host
wget https://raw.githubusercontent.com/librenms/librenms-agent/master/agent-local/rrdcached -O /etc/snmp/rrdcached
-
Make the script executable
chmod +x /etc/snmp/rrdcached
-
Edit your snmpd.conf file (usually
/etc/snmp/snmpd.conf
) and add:extend rrdcached /etc/snmp/rrdcached
SDFS info
A small shell script that exportfs SDFS volume info.
SNMP Extend
-
Download the script onto the desired host
wget https://raw.githubusercontent.com/librenms/librenms-agent/master/snmp/sdfsinfo -O /etc/snmp/sdfsinfo
-
Make the script executable
chmod +x /etc/snmp/sdfsinfo
-
Edit your snmpd.conf file (usually /etc/snmp/snmpd.conf) and add:
extend sdfsinfo /etc/snmp/sdfsinfo
-
Restart snmpd on your host
The application should be auto-discovered as described at the top of the page. If it is not, please follow the steps set out under SNMP Extend
heading top of page.
Seafile
SNMP extend script to monitor your Seafile Server
SNMP Extend
- Copy the Python script, seafile.py, to the desired host
wget https://github.com/librenms/librenms-agent/raw/master/snmp/seafile.py -O /etc/snmp/seafile.py
Also you have to install the requests Package for Python3. Under Ubuntu/Debian just run apt install python3-requests
-
Make the script executable
chmod +x /etc/snmp/seafile.py
-
Edit your snmpd.conf file and add:
extend seafile /etc/snmp/seafile.py
-
You will also need to create the config file, which is named seafile.json . The script has to be located at /etc/snmp/.
{"url": "https://seafile.mydomain.org", "username": "[email protected]", "password": "password", "account_identifier": "name" "hide_monitoring_account": true }
The variables are as below.
url = Url how to get access to Seafile Server
username = Login to Seafile Server.
It is important that used Login has admin privileges.
Otherwise most API calls will be denied.
password = Password to the configured login.
account_identifier = Defines how user accounts are listed in RRD Graph.
Options are: name, email
hide_monitoring_account = With this Boolean you can hide the Account which you
use to access Seafile API
Note:It is recommended to use a dedicated Administrator account for monitoring.
SMART
SNMP Extend
-
Copy the Perl script, smart, to the desired host.
wget https://github.com/librenms/librenms-agent/raw/master/snmp/smart -O /etc/snmp/smart
-
Make the script executable
chmod +x /etc/snmp/smart
-
Edit your snmpd.conf file and add:
extend smart /etc/snmp/smart
-
You will also need to create the config file, which defaults to the same path as the script, but with .config appended. So if the script is located at /etc/snmp/smart, the config file will be
/etc/snmp/smart.config
. Alternatively you can also specific a config via-c
.
Anything starting with a # is comment. The format for variables is $variable=$value. Empty lines are ignored. Spaces and tabes at either the start or end of a line are ignored. Any line with out a matched variable or # are treated as a disk.
#This is a comment
cache=/var/cache/smart
smartctl=/usr/bin/env smartctl
useSN=1
ada0
ada1
da5 /dev/da5 -d sat
twl0,0 /dev/twl0 -d 3ware,0
twl0,1 /dev/twl0 -d 3ware,1
twl0,2 /dev/twl0 -d 3ware,2
The variables are as below.
cache = The path to the cache file to use. Default: /var/cache/smart
smartctl = The path to use for smartctl. Default: /usr/bin/env smartctl
useSN = If set to 1, it will use the disks SN for reporting instead of the device name.
1 is the default. 0 will use the device name.
A disk line is can be as simple as just a disk name under /dev/. Such as in the config above The line "ada0" would resolve to "/dev/ada0" and would be called with no special argument. If a line has a space in it, everything before the space is treated as the disk name and is what used for reporting and everything after that is used as the argument to be passed to smartctl.
If you want to guess at the configuration, call it with -g and it will print out what it thinks it should be.
- Restart snmpd on your host
If you have a large number of more than one or two disks on a system, you should consider adding this to cron. Also make sure the cache file is some place it can be written to.
*/3 * * * * /etc/snmp/smart -u
- If your snmp agent runs as user "snmp", edit your sudo users (usually
visudo
) and add at the bottom:snmp ALL=(ALL) NOPASSWD: /etc/snmp/smart, /usr/bin/env smartctl
and modify your snmpd.conf file accordingly:
extend smart /usr/bin/sudo /etc/snmp/smart
The application should be auto-discovered as described at the top of the page. If it is not, please follow the steps set out under SNMP Extend
heading top of page.
If you set useSN to 1, it is worth noting that you will loose history(not able to access it from the web interface) for that device each time you change it. You will also need to run camcontrol or the like on said server to figure out what device actually corresponds with that serial number.
Also if the system you are using uses non-static device naming based on bus information, it may be worthwhile just using the SN as the device ID is going to be irrelevant in that case.
Squid
SNMP Proxy
-
Enable SNMP for Squid like below, if you have not already, and restart it.
acl snmppublic snmp_community public snmp_port 3401 snmp_access allow snmppublic localhost snmp_access deny all
-
Restart squid on your host.
-
Edit your snmpd.conf file and add, making sure you have the same community, host, and port as above:
proxy -v 2c -Cc -c public 127.0.0.1:3401 1.3.6.1.4.1.3495
For more advanced information on Squid and SNMP or setting up proxying for net-snmp, please see the links below.
http://wiki.squid-cache.org/Features/Snmp http://www.net-snmp.org/wiki/index.php/Snmpd_proxy
Supervisord
It shows you the totals per status and also the uptime per process. That way you can add alerts for instance when there are process in state FATAL
.
SNMP Extend
-
Copy the python script to the desired host.
Notice that this will use the default unix socket path. Modify thewget https://github.com/librenms/librenms-agent/raw/master/snmp/supervisord.py -O /etc/snmp/supervisord.py
unix_socket_path
variable in the script if your path differs from the default. -
Make the script executable
chmod +x /etc/snmp/supervisord.py
-
Edit your snmpd.conf file (usually /etc/snmp/snmpd.conf) and add:
extend supervisord /etc/snmp/supervisord.py
-
Restart snmpd on your host
systemctl restart snmpd
Sagan
For metrics the stats are migrated as below from the stats JSON.
f_drop_percent
and drop_percent
are computed based on the found data.
Instance Key | Stats JSON Key |
---|---|
uptime | .stats.uptime |
total | .stats.captured.total |
drop | .stats.captured.drop |
ignore | .stats.captured.ignore |
threshold | .stats.captured.theshold |
after | .stats.captured.after |
match | .stats.captured.match |
bytes | .stats.captured.bytes_total |
bytes_ignored | .stats.captured.bytes_ignored |
max_bytes_log_line | .stats.captured.max_bytes_log_line |
eps | .stats.captured.eps |
f_total | .stats.flow.total |
f_dropped | .stats.flow.dropped |
Those keys are appended with the name of the instance running with _
between the instance name and instance metric key. So uptime
for ids
would be ids_uptime
.
The default is named 'ids' unless otherwise specified via the extend.
There is a special instance name of .total
which is the total of all the instances. So if you want the total eps, the metric would be .total_eps
. Also worth noting that the alert value is the highest one found among all the instances.
SNMP Extend
-
Install the extend.
cpanm Sagan::Monitoring
-
Setup cron. Below is a example.
*/5 * * * * /usr/local/bin/sagan_stat_check > /dev/null
-
Configure snmpd.conf
extend sagan-stats /usr/bin/env PATH=/sbin:/bin:/usr/sbin:/usr/bin:/usr/local/sbin:/usr/local/bin sagan_stat_check -c
-
Restart snmpd on your system.
You will want to make sure that sagan is setup to with the values set below for stats-json processor, for a single instance setup..
enabled: yes
time: 300
subtract_old_values: true
filename: "$LOG_PATH/stats.json"
Any configuration of sagan_stat_check should be done in the cron setup. If the default does not work, check the docs for it at MetaCPAN for sagan_stat_check
Suricata
SNMP Extend
-
Install the extend.
cpanm Suricata::Monitoring
-
Setup cron. Below is a example.
*/5 * * * * /usr/local/bin/suricata_stat_check > /dev/null
-
Configure snmpd.conf
extend suricata-stats /usr/bin/env PATH=/sbin:/bin:/usr/sbin:/usr/bin:/usr/local/sbin:/usr/local/bin suricata_stat_check -c
Or if you want to use try compressing the return via Base64+GZIP...
extend suricata-stats /usr/bin/env PATH=/sbin:/bin:/usr/sbin:/usr/bin:/usr/local/sbin:/usr/local/bin suricata_stat_check -c -b
- Restart snmpd on your system.
You will want to make sure Suricata is set to output the stats to the eve file once a minute. This will help make sure that it won't be to far back in the file and will make sure it is recent when the cronjob runs.
Any configuration of suricata_stat_check should be done in the cron setup. If the default does not work, check the docs for it at MetaCPAN for suricata_stat_check
Systemd
The systemd application polls systemd and scrapes systemd units' load, activation, and sub states.
SNMP Extend
-
Copy the python script, systemd.py, to the desired host
wget https://github.com/librenms/librenms-agent/raw/master/snmp/systemd.py -O /etc/snmp/systemd.py
-
Make the script executable
chmod +x /etc/snmp/systemd.py
-
Edit your snmpd.conf file and add:
extend systemd /etc/snmp/systemd.py
-
(Optional) Create a /etc/snmp/systemd.json file and specify: a.) "systemctl_cmd" - String path to the systemctl binary [Default: "/usr/bin/systemctl"] b.) "include_inactive_units" - True/False string to include inactive units in results [Default: "False"]
{ "systemctl_cmd": "/bin/systemctl", "include_inactive_units": "True" }
-
(Optional) If you have SELinux in Enforcing mode, you must add a module so the script can access systemd state:
cat << EOF > snmpd_systemctl.te module snmpd_systemctl 1.0; require { type snmpd_t; type systemd_systemctl_exec_t; type init_t; class file { execute execute_no_trans map open read }; class unix_stream_socket connectto; class system status; } #============= snmpd_t ============== allow snmpd_t init_t:system status; allow snmpd_t init_t:unix_stream_socket connectto; allow snmpd_t systemd_systemctl_exec_t:file { execute execute_no_trans map open read }; EOF checkmodule -M -m -o snmpd_systemctl.mod snmpd_systemctl.te semodule_package -o snmpd_systemctl.pp -m snmpd_systemctl.mod semodule -i snmpd_systemctl.pp
-
Restart snmpd.
TinyDNS aka djbdns
Agent
Install the agent on this device if it isn't already and copy the tinydns
script to /usr/lib/check_mk_agent/local/
Note: We assume that you use DJB's Daemontools to start/stop tinydns. And that your tinydns instance is located in /service/dns
, adjust this path if necessary.
-
Replace your log's
run
file, typically located in/service/dns/log/run
with:#!/bin/sh exec setuidgid dnslog tinystats ./main/tinystats/ multilog t n3 s250000 ./main/
-
Create tinystats directory and chown:
mkdir /service/dns/log/main/tinystats chown dnslog:nofiles /service/dns/log/main/tinystats
-
Restart TinyDNS and Daemontools:
/etc/init.d/svscan restart
Note: Some saysvc -t /service/dns
is enough, on my install (Gentoo) it doesn't rehook the logging and I'm forced to restart it entirely.
Unbound
Unbound configuration:
# Enable extended statistics.
server:
extended-statistics: yes
statistics-cumulative: yes
remote-control:
control-enable: yes
control-interface: 127.0.0.1
Restart your unbound after changing the configuration, verify it is working by running unbound-control stats
.
Option 1. SNMP Extend (Preferred and easiest method)
-
Copy the shell script, unbound, to the desired host
wget https://github.com/librenms/librenms-agent/raw/master/snmp/unbound -O /etc/snmp/unbound
-
Make the script executable
chmod +x /etc/snmp/unbound
-
Edit your snmpd.conf file and add:
extend unbound /usr/bin/sudo /etc/snmp/unbound
-
Restart snmpd.
The application should be auto-discovered as described at the top of the page. If it is not, please follow the steps set out under SNMP Extend
heading top of page.
Option 2. Agent
Install the agent on this device if it isn't already and copy the unbound.sh
script to /usr/lib/check_mk_agent/local/
UPS-nut
A small shell script that exports nut ups status.
SNMP Extend
-
Copy the shell script, unbound, to the desired host
wget https://github.com/librenms/librenms-agent/raw/master/snmp/ups-nut.sh -O /etc/snmp/ups-nut.sh
-
Make the script executable
chmod +x /etc/snmp/ups-nut.sh
-
Edit your snmpd.conf file (usually /etc/snmp/snmpd.conf) and add:
extend ups-nut /etc/snmp/ups-nut.sh
-
Restart snmpd on your host
The application should be auto-discovered as described at the top of the page. If it is not, please follow the steps set out under SNMP Extend
heading top of page.
Optionally if you have multiple UPS or your UPS is not named APCUPS you can specify its name as an argument into /etc/snmp/ups-nut.sh
extend ups-nut /etc/snmp/ups-nut.sh ups1
extend ups-nut /etc/snmp/ups-nut.sh ups2
UPS-apcups
A small shell script that exports apcacess ups status.
SNMP Extend
-
Copy the shell script, unbound, to the desired host
wget https://github.com/librenms/librenms-agent/raw/master/snmp/ups-apcups -O /etc/snmp/ups-apcups
-
Make the script executable
chmod +x /etc/snmp/ups-apcups
-
Edit your snmpd.conf file (usually /etc/snmp/snmpd.conf) and add:
extend ups-apcups /etc/snmp/ups-apcups
If 'apcaccess' is not in the PATH enviromental variable snmpd is using, you may need to do something like below.
extend ups-apcups/usr/bin/env PATH=/sbin:/bin:/usr/sbin:/usr/bin:/usr/local/sbin:/usr/local/bin /etc/snmp/ups-apcups
- Restart snmpd on your host
The application should be auto-discovered as described at the top of the page. If it is not, please follow the steps set out under SNMP Extend
heading top of page.
Voip-monitor
Shell script that reports cpu-load/memory/open-files files stats of Voip Monitor
SNMP Extend
-
Download the script onto the desired host
wget https://raw.githubusercontent.com/librenms/librenms-agent/master/snmp/voipmon-stats.sh -O /etc/snmp/voipmon-stats.sh
-
Make the script executable
chmod +x /etc/snmp/voipmon-stats.sh
-
Edit your snmpd.conf file (usually
/etc/snmp/voipmon-stats.sh
) and add:extend voipmon /etc/snmp/voipmon-stats.sh
Wireguard
The wireguard application polls the Wireguard service and scrapes all client statistics for all interfaces configured as Wireguard interfaces.
SNMP Extend
-
Copy the python script, wireguard.py, to the desired host
wget https://github.com/librenms/librenms-agent/raw/master/snmp/wireguard.py -O /etc/snmp/wireguard.py
-
Make the script executable
chmod +x /etc/snmp/wireguard.py
-
Edit your snmpd.conf file and add:
extend wireguard /etc/snmp/wireguard.py
-
Create a /etc/snmp/wireguard.json file and specify: a.) (optional) "wg_cmd" - String path to the wg binary ["/usr/bin/wg"] b.) "public_key_to_arbitrary_name" - A dictionary to convert between the publickey assigned to the client (specified in the wireguard interface conf file) to an arbitrary, friendly name. The friendly names MUST be unique within each interface. Also note that the interface name and friendly names are used in the RRD filename, so using special characters is highly discouraged.
{ "wg_cmd": "/bin/wg", "public_key_to_arbitrary_name": { "wg0": { "z1iSIymFEFi/PS8rR19AFBle7O4tWowMWuFzHO7oRlE=": "client1", "XqWJRE21Fw1ke47mH1yPg/lyWqCCfjkIXiS6JobuhTI=": "server.domain.com" } } }
-
Restart snmpd.
ZFS
SNMP Extend
zfs-linux
requires python3 >=python3.5.
The installation steps are:
- Copy the polling script to the desired host (the host must be added to LibreNMS devices)
- Make the script executable
- Edit snmpd.conf to include ZFS stats
FreeBSD
wget https://github.com/librenms/librenms-agent/raw/master/snmp/zfs-freebsd -O /etc/snmp/zfs-freebsd
chmod +x /etc/snmp/zfs-freebsd
echo "extend zfs /etc/snmp/zfs-freebsd" >> /etc/snmp/snmpd.conf
Linux
wget https://github.com/librenms/librenms-agent/raw/master/snmp/zfs-linux -O /etc/snmp/zfs-linux
chmod +x /etc/snmp/zfs-linux
echo "extend zfs /usr/bin/sudo /etc/snmp/zfs-linux" >> /etc/snmp/snmpd.conf
Edit your sudo users (usually visudo
) and add at the bottom:
snmp ALL=(ALL) NOPASSWD: /etc/snmp/zfs-linux
Now restart snmpd and you're all set.